Feedback
Build your first integration point
You can use this tutorial to build a simple integration point that ingests data from an XML file and loads it into Relativity dynamic objects (RDOs). It describes how to create the custom page used in Relativity UI for user input and explains how to build the provider that ingests the data.
The process for developing an integration point follows many of the same steps used for developing other Relativity platform components. You learn how to set up a Visual Studio project where you add the source code for your custom page and provider. Additionally, the tutorial explains how to create your application, add the required libraries as references, and upload your customizations to Relativity for deployment.
After you complete this basic tutorial, consider reviewing the advanced integration point example. You can use the advanced sample to learn about developing integration points with complex data types. It illustrates how you can load JSON formatted data into Relativity Dynamic Objects (RDOs). For more information, see Build an advanced integration point.
If you don't want to work through the tutorial, you can also obtain the MyFirstProvider solution from the Relativity Integration Points SDK. Complete the following tasks:
- Download and extract the Relativity Integration Points SDK.
- Navigate to the \Integration Points SDK\Examples\MyFirstProvider folder.
- Open the MyFirstProvider.sln file in Visual Studio 2015. If you want to build the solution, you must add the .dll files for event handlers, custom pages, and Integration Points. See Set up your Visual Studio solution.
Before you begin
Complete the following tasks before building your integration point:
- Obtain access to an instance of Relativity used for development purposes.
- Ensure that you have access to a workspace where Relativity Integration Points is installed. To use your integration point provider, you need access to the Integration Points tab added during installation.
- Download and run the Relativity SDK installer. For more information, see Download the SDKs.
- Download and unzip the Integration Points SDK. For more information, see Download the SDKs and NuGet packages and Integration Points SDK files.
- Set up your development environment making sure that you enable Developer mode.
You must use Visual Studio 2015 to develop integration points for Relativity 9.4 or above.
Create a Relativity application
Before you write the code for your integration point, you need to create your custom application in Relativity so that you can obtain its GUID. You add this GUID as a global constant to your source code for later use when building your custom page.
Use these steps to create a custom application:
- Open the Relativity instance used for development.
Ensure you see the banner at the top of the web page that says Developer Mode is Active.
- Create a new workspace called Salt vs. Pepper.
Relativity Integrations Point must be installed in the workspace, where you want to deploy the integration point provider that you create in this tutorial. If you don't see the Integration Points tab, the application isn't installed. For more information, see Relativity Integration Points on the RelativityOne documentation site.
- Click the Application Admin > Relativity Applications tabs.
- Click the New Relativity Application button.
- Select or enter the following information in the Application layout:
- Application Type - select Create new Application.
- New Application Name - enter My First Provider application.

- Click Save to display the details view for your application.
- To obtain your application GUID, click Show Component GUIDs in the console on the application details view. The Show Component GUIDs link is available only in Developer mode.

- Copy the GUID for your application from the dialog. You must reference this GUID in the source code for your new integration point. See Define global constants.

- In the Manage Application console, click Push to Library. You can now associate any resource files that you later add with your application.
Set up your Visual Studio solution
When setting up the Visual Studio solution for your integration point, you add two projects to it. You create an ASP.NET application for client components and then add a class library project that includes your provider logic.
Use these steps to set up your Visual Studio solution:
- Open Visual Studio 2015.
You must use Visual Studio 2015 to develop integration points for Relativity 9.4 or above.
- Click New Project > Web > ASP.NET Web Application.
- Enter MyFirstProvider in the Name box. Click OK.
Clear the Add Application Insights SDK box if you don't want to collect usage data.

- Select Empty as the template for your project, and select the MVC checkbox.

- Clear the Host in the cloud checkbox, and click OK.
- Use these steps to uninstall the NuGet packages used for the .NET compilers:
- Right-click on the Solution 'MyFirstProvider', and click Manage NuGet Packages for Solution.
- Highlight the Microsoft.CodeDom.Providers.DotNetCompilerPlatform.
- Select the MyFirstProvider project in the Versions table.

- Click Uninstall, and then click OK.
- Repeat steps 6b - 6d to remove the Microsoft.Net.Compilers package.
- Right-click on the MyFirstProvider folder in the Solution Explorer. Click Add > New Folder, and add a folder called Scripts.

- To add the required JavaScript files, right-click on the Scripts folder and click Add > Existing Item. Navigate to the folder where you extracted the Integration Points SDK files, and select the following files:
- frame-messaging.js
- jquery-3.4.1.js
- jquery-postMessage.js

- To add the .dll file for custom pages, right-click References under the MyFirstProvider project, and then click Add Reference on the menu. Navigate to the folder where you installed the Relativity SDK, and select the Relativity.CustomPages.dll file.

- In Solution Explorer, right-click Solution 'MyFirstProvider', and then click Add > New Project.

- In the Add New Project window, click Visual C# > Windows > Class Library. Enter Provider in the Name box and click OK.
- To add the .dll file for event handlers, right-click References under the Provider project, and then click Add Reference. Navigate to the folder where you installed the Relativity SDK, and select the kCura.EventHandler.dll file. Click Add.
- Navigate to the folder where you extracted the Integration Points SDK. Repeat the previous step to select the .dll files called Relativity.IntegrationPoints.Contracts.dll, Relativity.IntegrationPoints.Services.Interfaces.Private.dll, and Relativity.IntegrationPoints.SourceProviderInstaller.dll. Click Add.

Define global constants
In your Visual Studio solution, you need to define global constants for the GUID used to identify your provider class, and the GUID that Relativity generated when you created your application.
- To add a new class for global constants, right-click the Provider project, and then click Add > Class. Enter GlobalConstants in the Name box and click Add.

Solution Explorer lists your new class:

- To create a GUID for your provider, click Tools, and select Create GUID from the menu.
- Select the 5. [Guid("xxxxxxx-xxxx...xxxx")], and then click Copy.

- Open your GlobalConstants class and then paste the GUID in the assignment statement for the FIRST_PROVIDER_GUID constant.
- Paste your application GUID in the assignment statement for APPLICATION_GUID constant. For information about obtaining your application GUID, see steps 7 - 8 in Create a Relativity application.
Your code for the global constants should be similar to the following sample. However, the GUIDs for your constants are unique to your environment.
Copyusing System;
using System.Collections.Generic;
using System.Linq;
using System.Text;
namespace Provider
{
public class GlobalConstants
{
public const string FIRST_PROVIDER_GUID = "c9de331d-2dca-4f78-85bd-91493d0b9b37";
public const string APPLICATION_GUID = "C3C026A1-7638-4D46-82FC-AAB59001C1F0";
}
}
Develop code for the client interface
The client interface for your integration point uses the custom page functionality available on the Relativity platform. For this sample integration point, you add a new controller for your provider. You also add a file containing JavaScript that subscribes to events that occur when a user clicks a button, when the current state needs to be persisted, and when pages load. For more information, see Best practices for integration point development.
For the view, you must add an HTML file where you embed references to your custom and other JavaScript files. The controller simply returns a class used to render the view.
This section includes the following tasks for building your client interface:
- Add custom code to the controller
- Add a custom JavaScript file
- Add custom code to the view
- Add a custom CSS file
Add custom code to the controller
The code for the controller returns an action result by calling the view method, which is a common practice for ASP.NET MVC applications.
- To add a new class for the controller, right-click the Controllers folder in the MyFirstProvider project, and then click Add > Controller.
- Highlight MVC 5 Controller - Empty and click Add.

- Enter ProviderController in the Controller Name box and click Add.

- Add the following code to this new class. Notice these key points about this class:
- The name of the method in this class must match the name of view. For example, the names of the method and view are Settings.
- The name of the method also matches the part of the path set in the myFirstProviderEntry.Url variable in the RegisterNewIntegrationPoint event handler. See Add event handlers for registering and uninstalling your provider.Copy
using System.Web.Mvc;
namespace Web.Controllers
{
public class ProviderController : Controller
{
//
// GET: /Provider/
public ActionResult Settings()
{
return View();
}
}
}
Add a custom JavaScript file
The JavaScript for your client must subscribe to several required events raised when users interact with the UI. For more information, see Subscribe to required JavaScript events.
Use these steps to add your custom JavaScript:
- In Solution Explorer, expand the MyFirstProvider project. Right-click the Scripts folder, and then click Add > JavaScript File. Enter first-provider in the Item name box and click OK.

- Open the first-provider.js file and add the following code to it:Copy
$(function () {
//Create a new communication object that talks to the host page.
var message = IP.frameMessaging();
var _getModel = function () {
return $('#fileLocation').val();
};
//An event raised when the user has clicked the Next or Save button.
message.subscribe('submit', function () {
//Execute save logic that persists the state.
var localModel = _getModel();
this.publish("saveState", localModel);
//Communicate to the host page that it to continue.
this.publish('saveComplete', localModel);
});
//An event raised when a user clicks the Back button.
message.subscribe('back', function () {
//Execute save logic that persists the state.
this.publish('saveState', _getModel());
});
//An event raised when the host page has loaded the current settings page.
message.subscribe('load', function (model) {
$('#fileLocation').val(model);
});
});
Add custom code to the view
The source code for the view includes a field where users can enter the location of their data files. It also references the JavaScript files added to the Script folder, and the new first-provider.js file created for this integration point. For more information about the JavaScript files, see Reference required JavaScript files in the view.
- Expand the Views folder in the MyFirstProvider project.
- To add a new class for the view, right-click on the Provider folder, and then click Add > View.
You must add your new view to a folder that has the same name as your controller. See Add custom code to the controller.
- Enter Settings in the View name box.
- Clear the Use a layout page checkbox, and click Add.
- Add the following code to this new class:Copy
@{
ViewBag.Title = "Settings";
}
<link href="~/Content/site.css" rel="stylesheet" />
<div class="card">
<label class="section label">My First Provider</label>
<div class="field-row">
<div class="field-label required">
File Location:
</div>
<div class="field-value ">
<input type="text" name="field" id="fileLocation" class="input-box" placeholder="Please enter a file location" />
</div>
</div>
</div>
<script src="~/Scripts/jquery-3.4.1.js"></script>
<script src="~/Scripts/jquery-postMessage.js"></script>
<script src="~/Scripts/frame-messaging.js"></script>
<script src="~/Scripts/first-provider.js"></script>
Add a custom CSS file
You can control the look and feel of your custom page by adding a custom style sheet. Relativity uses these styles to display the My First Provider section and File Location box on your custom page.
Use these steps to add a CSS file:
- In Solution Explorer, expand the MyFirstProvider project and the Content folder.
You may need to add a Content folder and a Site.css file to it.
- Overwrite the style sheet called Site.css by adding the following code to it:Copy
.input-box
{
height: 26px;
border: 1px solid #c1c1c1;
color: #102d4f;
border-radius: 3px;
width: 750px;
}
*{
box-sizing: border-box;
}
html
{
background-color: white;
font-family: "Open Sans", sans-serif;
font-weight: 400;
font-size: 1em;
color: #666666;
}
.card
{
background-color: #f7f7f7;
border: 1px solid #c1c1c1;
border-radius: 3px;
box-shadow: 1px 1px 3px #b7b7b7;
padding: 10px;
margin: 15px 12px 0 12px;
}
.card .label
{
color: #3471b7;
font-size: 13px;
font-weight: 600;
}
.card .field-label
{
color: #404040;
text-align: right;
padding-right: 5px;
min-width: 200px;
display: table-cell;
border-right: 3px solid transparent;
font-size: .85em;
}
.card .field-label.required
{
border-right: 3px solid #f59d1f;
}
.card .field-value
{
display: table-cell;
padding-left: 5px;
font-size: 0.85em;
}
.card .field-row
{
padding: 5px 0;
}
Develop code for your provider
In the Provider project, you add the logic for ingesting XML data to a class called MyFirstProvider.cs. Next, you implement a data reader class that reads the contents of an XML file. You also add an event handler used to register your provider with Relativity, and another that removes the provider from Relativity when you want to uninstall it from a workspace. The Integration Points framework includes the IntegrationPointSourceProviderInstaller and IntegrationPointSourceProviderUninstaller classes, which extend Post Install and Pre Uninstall event handlers. For more information, see Develop application event handlers.
This section includes the following tasks for building your provider:
- Add a provider class
- Add a data reader class
- Add event handlers for registering and uninstalling your provider
- Compile your source code
Add a provider class
Use these steps to add a provider class:
- To add a new class for your provider, right-click the Provider project, and then click Add > Class. Enter MyFirstProvider in the Name box and click Add.
- Add the following code for the provider class that ingests XML data into Relativity. Notice these key points about this class:
- Sets the DataSourceProviderAttribute with the global constant defined with the GUID that uniquely identifies the provider.
- Implements the IDataSourceProvider interface and provides import logic for the GetBatchableIds(), GetData(), and GetFields(). For more information, see Use methods for batching in your provider code.
- Includes methods that return the DataReader object for reading data from your input stream.Copy
using System.Collections.Generic;
using System.Data;
using System.Linq;
using System.Xml;
using Relativity.IntegrationPoints.Contracts;
using Relativity.IntegrationPoints.Contracts.Models;
using Relativity.IntegrationPoints.Contracts.Provider;
namespace Relativity.IntegrationPoints.MyFirstProvider.Provider
{
/// <summary>
/// This code is a sample fully operational Integration Point Provider
/// for demonstration purposes only
/// </summary>
[DataSourceProvider(GlobalConstants.FIRST_PROVIDER_GUID)]
public class MyFirstProvider : IDataSourceProvider
{
public IEnumerable<FieldEntry> GetFields(DataSourceProviderConfiguration providerConfiguration)
{
string fileLocation = providerConfiguration.Configuration;
XmlDocument doc = new XmlDocument();
doc.Load(fileLocation);
XmlNodeList nodes = doc.DocumentElement.SelectNodes("/root/columns/column");
var fieldEntries = new List<FieldEntry>();
foreach (XmlNode node in nodes)
{
var field = node.InnerText;
fieldEntries.Add(new FieldEntry { DisplayName = field, FieldIdentifier = field, IsIdentifier = field.Equals("Name") });
}
return fieldEntries;
}
public IDataReader GetBatchableIds(FieldEntry identifier, DataSourceProviderConfiguration providerConfiguration)
{
string fileLocation = providerConfiguration.Configuration;
DataTable dt = new DataTable();
dt.Columns.Add(identifier.FieldIdentifier);
XmlDocument doc = new XmlDocument();
doc.Load(fileLocation);
XmlNodeList nodes = doc.DocumentElement.SelectNodes(string.Format("/root/data/document/{0}", identifier.FieldIdentifier));
foreach (XmlNode node in nodes)
{
var row = dt.NewRow();
row[identifier.FieldIdentifier] = node.InnerText;
dt.Rows.Add(row);
}
return dt.CreateDataReader();
}
public IDataReader GetData(IEnumerable<FieldEntry> fields, IEnumerable<string> entryIds, DataSourceProviderConfiguration providerConfiguration)
{
string fileLocation = providerConfiguration.Configuration;
List<string> fieldList = fields.Select(f => f.FieldIdentifier).ToList();
string keyFieldName = fields.FirstOrDefault(f => f.IsIdentifier).FieldIdentifier;
return new XMLDataReader(entryIds, fieldList, keyFieldName, fileLocation);
}
}
}
Add a data reader class
Use these steps to add a data reader class:
- To add a new data reader class, right-click the Provider project, and then click Add > Class. Enter XMLDataReader in the Name box and click Add.
- Add the following code for the provider class that ingests XML data into Relativity. Notice these key points about this class:
- Implements the IDataReader interface.
- Includes private fields used by the data reader when it iterates over the contents of the XML file.
- Includes a constructor used to set the values for the fields in this class.
- Implements the Read() method for iterating over the nodes in the XML file.
Add event handlers for registering and uninstalling your provider
Use these steps to adding event handlers:
- In the Solution Explorer, right-click the Provider project, and then click Add > Add New Folder. Add a folder called EventHandlers.
- To add a new class for an event handler, right-click the EventHandlers folder in the Provider project, and then click Add > Class. Enter RegisterNewIntegrationPoint in the Name box and click Add.
- Add the following code for the event handler that registers your provider. Notice these key points about this event handler class:
- Extends the IntegrationPointSourceProviderInstaller class.
- Provides a description attribute that appears in the Relativity UI.
- Sets the RunOnce attribute to false.
- Provides a GUID as a unique identifier. Use the Create GUID option to generate a new GUID for your event handler. See Define global constants.
- Updates the workspace database with information about your provider, including the URL of its custom page, the custom application associated with it, and other information.
- For more information about setting the ViewDataUrl property, see the Visual Studio solution in the MyFirstProvider.zip file. It contains the code for the ProviderAPIController source code used to display specific information about a provider in the Relativity UI, such as the path to the data source. To simplify this tutorial, this controller hasn't been added here. You can also found another example showing how to use the ViewDataUrl property in Set the ViewDataUrl property and Build an advanced integration point.Copy
using Relativity.IntegrationPoints.Contracts;
using Relativity.IntegrationPoints.SourceProviderInstaller;
namespace Relativity.IntegrationPoints.MyFirstProvider.Provider.EventHandlers
{
[kCura.EventHandler.CustomAttributes.Description("Update My First provider - On Every Install")]
[kCura.EventHandler.CustomAttributes.RunOnce(false)]
[Guid("bd0c749d-dc8d-4b9c-b4f7-2ea4f508089e")]
public class RegisterNewIntegrationPoint : IntegrationPointSourceProviderInstaller
{
public override IDictionary<Guid, SourceProvider> GetSourceProviders()
{
var sourceProviders = new Dictionary<Guid, SourceProvider>();
var myFirstProviderEntry = new SourceProvider
{
Name = "My First Provider",
Url = $"/%applicationpath%/CustomPages/{GlobalConstants.APPLICATION_GUID}/Provider/Settings",
ViewDataUrl = $"/%applicationpath%/CustomPages/{GlobalConstants.APPLICATION_GUID}/%appId%/api/ProviderAPI/GetViewFields"
};
sourceProviders.Add(Guid.Parse(GlobalConstants.FIRST_PROVIDER_GUID), myFirstProviderEntry);
return sourceProviders;
}
}
}
- Add another new class for an event handler by right-clicking the EventHandlers folder in the Provider project and then clicking Add > Class. Enter RemoveMyFirstProvider in the Name box and click Add.
- Add the following code for the event handler that uninstalls your provider. Notice these key points about this event handler class:
- Extends the IntegrationPointSourceProviderUninstaller class.
- Provides a description attribute that appears in the Relativity UI.
- Sets the RunOnce attribute to false.
- Provides a GUID as a unique identifier. Use the Create GUID option to generate a new GUID for your event handler. See Define global constants.Copy
using System.Runtime.InteropServices;
using Relativity.IntegrationPoints.SourceProviderInstaller;
namespace Relativity.IntegrationPoints.MyFirstProvider.Provider.EventHandlers
{
[kCura.EventHandler.CustomAttributes.Description("Update My First provider - Uninstall")]
[kCura.EventHandler.CustomAttributes.RunOnce(false)]
[Guid("a2e8a386-af25-42f9-ab99-1063e8547114")]
public class RemoveMyFirstProvider : IntegrationPointSourceProviderUninstaller
{
}
}
Compile your source code
After you add your classes to the Provider project, you can build your solution. On the Visual Studio menu, click Build > Build Solution.

You can now add your assemblies to Relativity so that you can deploy them in your custom application.
Deploy your integration point
After your integration point assembly builds successfully, you can upload it to Relativity. This process includes the following steps:
- Uploading the required Integration Points .dll files and your provider .dll file to the Resource tab in Relativity and associating it with your custom application.
- Adding your event handlers to your custom application.
- Packaging the files that your custom page uses, adding them to your application, and then pushing the application to the Application Library, so that your custom page deploys on the web server.
- Installing your new application in a workspace to trigger the event handlers to run.
This section includes the following tasks for deploying your integration point:
- Upload required .dll files
- Publish your custom page project
- Upload your custom page
- Install your application
Upload required .dll files
Use these steps to upload your .dll file:
- Open the Relativity instance used for development.
- Search on resource file to navigate to the Resource File tab. Click New Resource File.
- In the Application field, click
 to select My First Provider application as the application. Click Save. This action links this assembly to the My First Provider application that you are developing.
 - In the Resource File field, click Browse to select the Relativity.IntegrationPoints.Contracts.dll from the directory where you built the project. Click Save. This .dll file should be in the in the debug folder of your Visual Studio project.

- Repeat steps 3 and 4 to add the following .dll files:
- Relativity.IntegrationPoints.SourceProviderInstaller
- Relativity.IntegrationPoints.Services.Interfaces.Private
Obtain this .dll file from the Integration Points SDK. See Integration Points SDK files.
- Provider.dll
- Any additional assemblies located in the Provider folder of the Integration Points SDK - see Integration Points SDK files.
- Navigate to the Salt vs. Pepper workspace where you added your application.
- To attach your event handlers, click the Application Admin > Relativity Applications tabs.
- Click My First Provider application to display the details view of your application.
- In the Manage Application console, click Unlock Application.
- In the Application Event Handler associative list, click New. Click to select the Provider.EventHandlers.RegisterNewIntegrationPoint for your application, and enter 10 in the Order box. Click Save.
- Repeat step 10 to select the EventHandlers.RemoveMyFirstProvider for your application, and enter 20 in the Order box.

Publish your custom page project
You need to publish your Visual Studio project that contains your custom page before you can upload the files to Relativity.
- In Visual Studio 2015, right-click on your MyFirstProvider web project and click Publish.

- Highlight Profile in the sidebar, and click Custom.
- Enter a name in the Profile name box. Click OK.

- In the Publish Method drop-down box, select File System.
- Click
 to set the Target location for your published files.
- Click Next and select Release from the Configuration drop-down box.
- Under File Publish Options, click Delete all existing files prior to publish.

- Click Publish.
- Navigate to the directory where you choose to publish your web application.
- Add the contents of the parent directory to a .zip file. (Don't add the parent directory to this file.)

- Optionally rename the file to Web.zip.
- Complete the steps in Upload your custom page.
Upload your custom page
Use these steps to add your custom page to My First Provider application:
- To attach the custom page to your application, click the Application Admin > Relativity Applications tabs.
- Click My First Provider application to display the details view of your application.
- In the Custom Page associative list, click New to display a form for adding a new custom page.
- Enter web in the Name box.
- In the File field, click Browse to upload the zipped archive that you created in step 1.
- In the Relativity Applications field, click to select the My First Provider application that you created.

- Click Save and Back to display the detail view of your application. You have now added the custom page to your application.

- To add your application to the Application Library, click Push to Library in the console on the application details view. You must add your application to the Application Library stored on the EDDS database before you can deploy your custom page.
After the application exists in the library, the Custom Page Deployment Manager agents detect the new entry and deploy the page to the appropriate area on the web server. They also set the required IIS settings to ensure your application is configured and ready to receive requests. Next, see Use your integration point in Relativity.
Install your application
After uploading your custom page, you need to install the application in the workspace. This process triggers the event handlers to run.
- On the details view of your application, click Unlock Application in the console.

- Click Upgrade Application to display the Application Type layout.
- To upgrade your application, click Select from Application Library.

- Click to select your application on the Select Library Application dialog, and click OK.
- Click Import. You can now use your integration point in the workspace.
Use your integration point in Relativity
You can now use your custom provider to import XML data into document objects in Relativity.
Use these steps to execute your integration point:
- Download the MyFirstProviderSampleData.zip file to your local machine and extract the .xml file. Using the following steps, you import this sample data with your new integration point.
While you can download this file to any location that you want, ensure that the Relativity web and agent servers have access to your location. For example, you might want to download and extract the data file to a network share that the user account running Relativity web, and the agent services can access.
- Navigate to the Salt vs. Pepper workspace where you added your custom application.
Relativity Integrations Point must be installed in the workspace, where you want to deploy your integration point provider. If you don't see the Integration Points tab, the application isn't installed.
- Click the Integration Points tab to display the list view.
- Click the New Integration Points button.
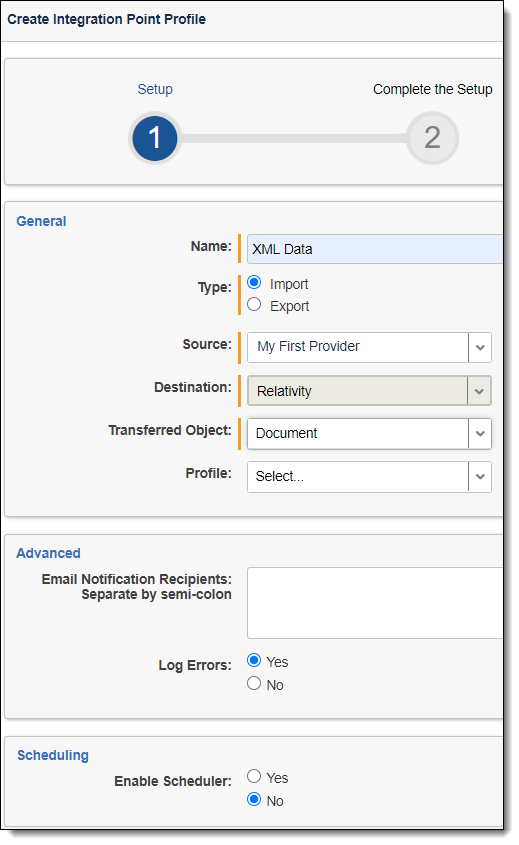
- Select or enter the following information in the Set Integration Details layout:
- Integration Name - enter XML Data.
- Source Provider - select My First Provider.
- Destination RDO - select Document.
- Click Next to display the custom page that you defined for your integration point.

- Enter the location of your sample data in the File Location box on the Connect to Source layout.
- Click Next to map the following fields using the right and left arrows:

- In Workspace Fields, map Control Number [Object Identifier] to Name in Source Attributes.
- In Workspace Fields, map Extracted Text to Text in Source Attributes.
- In the Unique Identifier box, select Control Number [Object Identifier].

- Click Save > Import Now.
For the purpose of this tutorial, you can ignore the error message that appears in the Source Configuration field on the General tab. When you implement other integration points, you can avoid displaying this error by adding a controller similar to the ProviderAPIController described in Add event handlers for registering and uninstalling your provider.
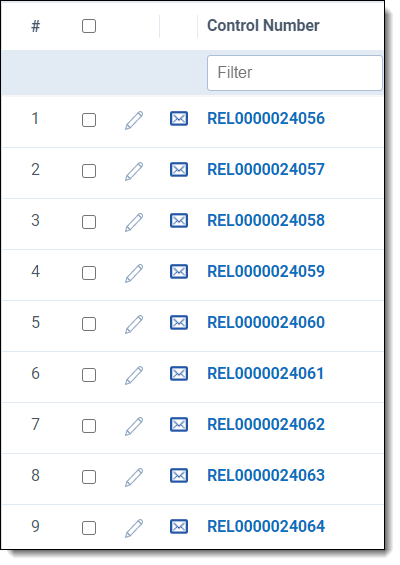
- Click the Documents tab. It displays the document objects created for each element in your data file.