Feedback
Build your first custom page
This tutorial illustrates how to create a simple custom page available from an external tab in Relativity. It describes how to complete the following tasks:
- Use the Relativity template for custom pages.
- Write the source code for a custom page.
- Package the custom page files.
- Add the custom page to an application.
- Create an external tab for displaying it in Relativity.
Your completed custom page displays your name and the current time in the Relativity UI.
You do not have to use Visual Studio and the Visual Studio templates to create custom pages. It is possible to create custom pages using HTML, JavaScript, and CSS. For an example of that approach, see Lesson 5 - Create a custom page, which is part of the Learn about Relativity development series of lessons.
Before you begin
Complete the following tasks to before you begin implementing a custom page:
- Obtain access to an instance of Relativity used for development purposes.
- Set up your development environment and enable Developer mode in Relativity. Visual Studio 2017 is used below to illustrate development tasks; however, this tutorial can be done with Visual Studio 2017 or Visual Studio 2019
- Install the Relativity templates in Visual Studio. This tutorial uses the custom page template. See Add templates through Visual Studio.
Build a custom page
The following example is based on WebForms. You can also use MVC5, WebApi2, or other frameworks supported under IIS and .NET 4.6.2.
Use these steps to build a simple custom page:
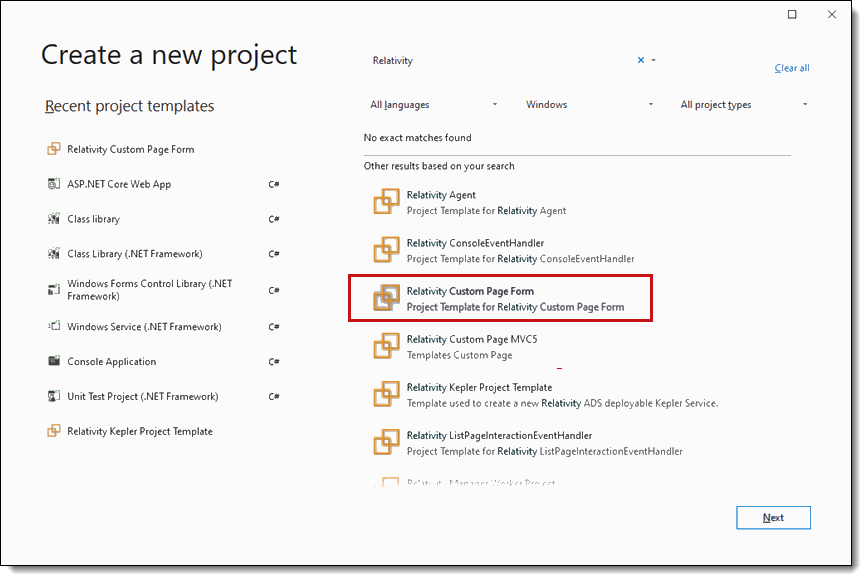
- In Visual Studio, create a new project named MyFirstCP using the Relativity Custom Page Form template.
- To open the NuGet Package Manager, click Tools > NuGet Package Manager > Manage NuGet Packages for Solution. Select and install the NuGet package for Relativity.CustomPages.
- Select the Relativity.CustomPages library that matches your environment version.

- Open Default.aspx and press SHIFT + F7 to open the design window.
- Press CTRL + ALT + X to open the toolbox.
- Double click on Label to add a label to the layout.
- Right-click on Label > Properties. Set the following properties:
- border style - select Double.
- border color - select Blue
- ID - update it to DisplayLabel.

- Navigate to Default.aspx.cs and set the text for the DisplayLabel.
This example uses the Visual Studio template for custom pages. It contains examples of information that you can return using the built-in Custom Pages Helper template. This tutorial doesn't use of all of them, so you can remove the unneeded ones.
Copyprotected void Page_Load(object sender, EventArgs e)
{
try
{
//Gets the user ID.
int userArtifactId = Relativity.CustomPages.ConnectionHelper.Helper().GetAuthenticationManager().UserInfo.ArtifactID;
//Gets the email address of the current user.
string userEmailAddress = Relativity.CustomPages.ConnectionHelper.Helper().GetAuthenticationManager().UserInfo.EmailAddress;
//Gets the first name of the current user.
string firstName = Relativity.CustomPages.ConnectionHelper.Helper().GetAuthenticationManager().UserInfo.FirstName;
//Gets the last name of the current user.
string lastName = Relativity.CustomPages.ConnectionHelper.Helper().GetAuthenticationManager().UserInfo.LastName;
//Gets the full name of the current user.
string fullName = Relativity.CustomPages.ConnectionHelper.Helper().GetAuthenticationManager().UserInfo.FullName;
//Gets the current user workspace artifact ID.
int currentUserWorkspaceArtifactId = Relativity.CustomPages.ConnectionHelper.Helper().GetAuthenticationManager().UserInfo.WorkspaceUserArtifactID;
string displayString = String.Format("User: {0}\r\nUser ID: {1}\r\nUser Email: {2}\r\n\r\n Hello {3}, the time is {4}.", fullName, userArtifactId, userEmailAddress, firstName, DateTime.Now.ToShortTimeString());
DisplayLabel.Text = displayString;
}
catch (Exception ex)
{
//Your custom page caught an exception
DisplayLabel.Text = ex.ToString();
}
} - Right-click on your MyFirstCP web project and click Publish.

- Click New, select Folder, and click Next to locate the file where you want to publish your custom page.
Don't overwrite any of your project files when specifying the target location. If publishing to the project directory, select a subdirectory.

- Click Finish.

- Expand Delete existing files. Verify that the Delete all existing files prior to publish option is selected. Click Save.

- Click Publish.
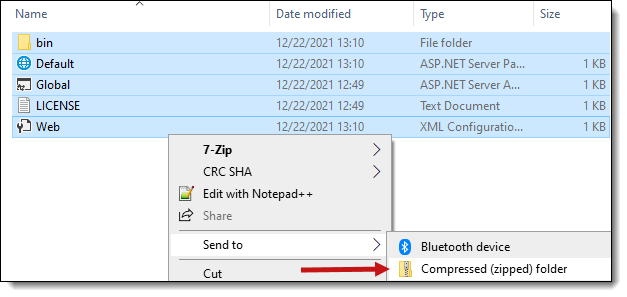
- Navigate to the directory where you published your web application.
- Add the contents of the parent directory to a .zip file. (Don't add the parent directory to this file.)
Save the files as a .zip file because other archive file types won't work properly.
If you used a blank web project to build this custom page, verify whether the bin directory has a folder called roslyn. If it contains this folder, follow the instructions provided in Can't upload custom pages published through Visual Studio 2015 and higher.
Deploy a custom page
To deploy a custom page:
- Open the Relativity instance used for development.
- Create a new workspace called Basic Samples. You can also use an existing workspace to deploy your custom page.
- Select the Workspace Admin tab and click Relativity Applications.
- Click the New Relativity Application.
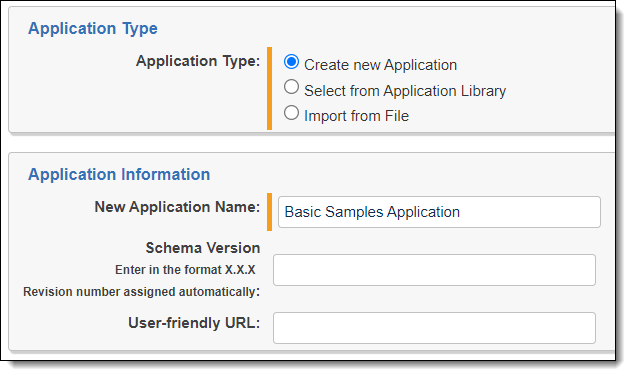
- In Application Type field, click Create new Application.
- In New Application Name field, enter Basic Samples Application.
- Click Save to display the detail view of the application, and then click Push to Library in the console on the application details view.
- Search for the Custom Page tab at the instance level.
- On the Custom page tab, click New Custom Page.
- In the Application field, click
 to select the application that you created.
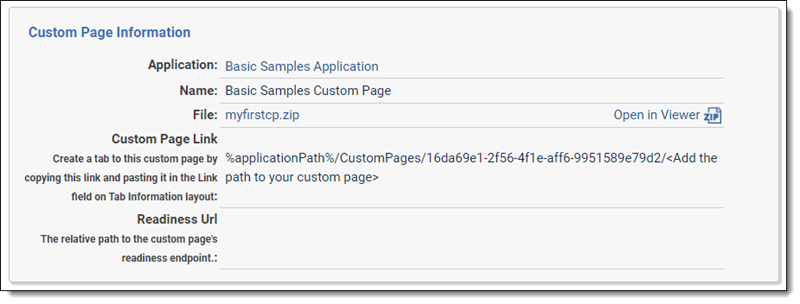
 - Enter Basic Samples Custom Page in the Name field.
- In the File field, click Choose File to upload your compressed archive created in step 15.
- Click Save to display the detail view of your custom page. Copy the URL in the Custom Page Link field. This field lists a base URL for the custom page. You can use this URL to link your page to a tab In Relativity.
- Navigate to your workspace.
- Search for the Relativity Applications tab at the workspace level.
- Locate the Basic Samples Application in the list and click on it to display the detail view.
- Click and confirm Unlock Application in the console on the application details view.
- In the Tab section of the application details view, click New to display a form for adding a tab.

- In the Name field, enter My Custom Page.
- Select External as the Link Type.
- In the Link field, paste the base URL for your custom page generated in step 13. Append Default.aspx to it. Your link uses the following format, which includes the GUID for your application:Copy
%applicationPath%/CustomPages/<YourRelativityApplicationGUID>/<FileName>See the following link for this example:
Copy%applicationPath%/CustomPages/<YourRelativityApplicationGUID>/Default.aspx - In the Order field, enter 1.
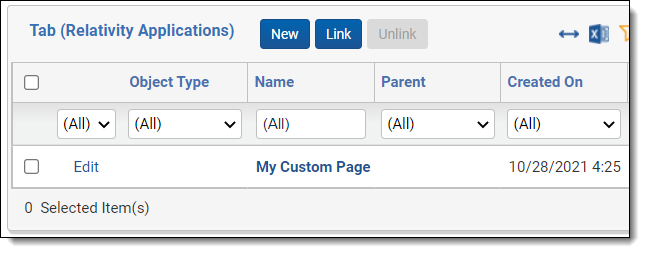
- Click Save and Back. Your new tab is displayed in the list page.
- To add your application to the Application Library, click Push to Library in the console on the application details view.
After you push the application to the library, the Custom Page Deployment Manager agents detect the new item and deploy the pages to the web server.
- Click
 in the Sidebar to display the All Tabs Menu with the new My Custom Page tab.
 - Click the My Custom Page tab to view your custom page. You may need to wait several minutes for the agents to deploy the pages so that your custom page is visible.