Feedback
Build your first event handler
This tutorial illustrates how to create a simple event handler that updates the Name field on a Relativity Dynamic Object (RDO). It describes how to complete the following tasks:
- Write the source code for this event handler.
- Inherit from the event handler base class.
- Override the Execute() method with your business logic.
- Add the compiled .dlls for the event handler to Relativity.
- Execute the event handler on an RDO.
For information about different types of event handlers, see Develop object type event handlers and Develop application event handlers.
Before you begin
Complete the following tasks to before you implement an event handler:
- Set up your development environment.
- Install the Relativity Visual Studio templates. For more information, see Visual Studio templates for Relativity.
- Obtain access to an instance of Relativity used for development purposes. In Relativity, confirm that you have system admin permissions. For more information, see Security and Permissions on the Relativity
Build an event handler
Use the following steps to build a simple event handler:
- Open Visual Studio.
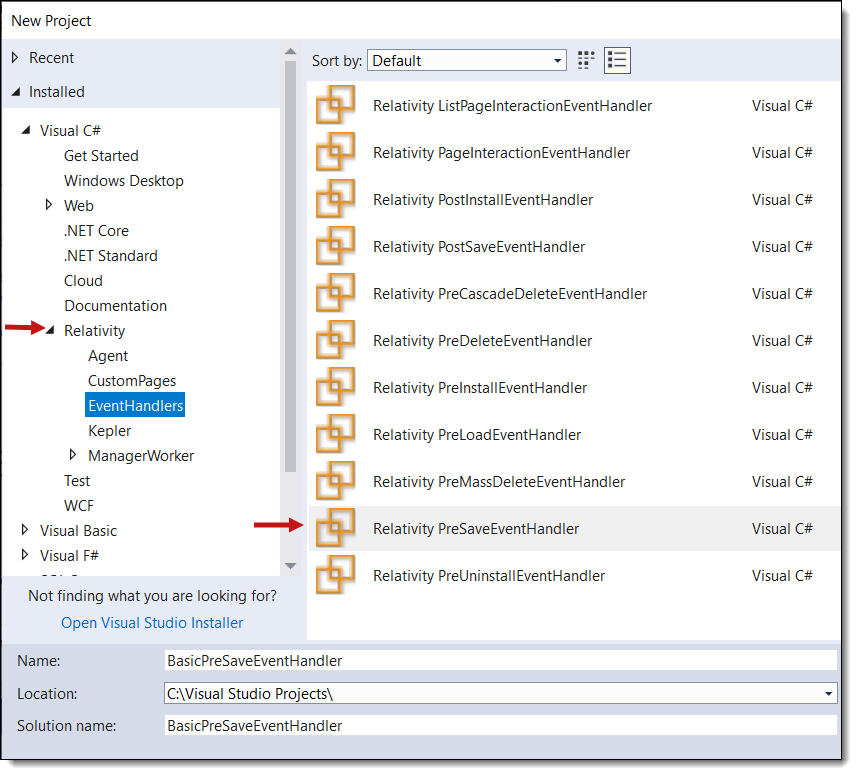
- Click File > New > Project.
- In the New Project dialog, expand Relativity and select EventHandlers.
- Enter BasicPreSaveEventHandler in the Name field and click OK.
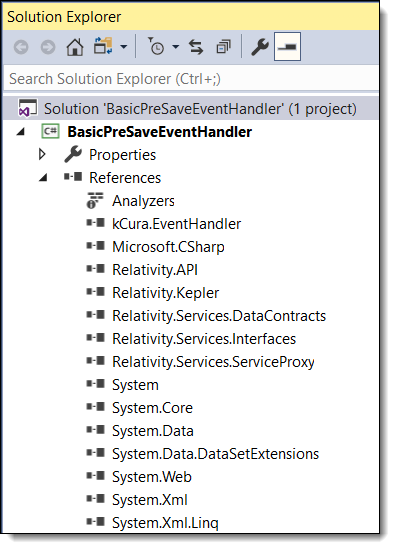
- To view the references in the project, right-click on References in the Solution Explorer. The references are added to the project as part of the template.
- In the Solution Explorer, right-click on the PreSaveEventHandler.cs file. This file displays the template code for an event handler.
- Update the kCura.EventHandler.CustomAttributes.Description to Basic Pre Save. This attribute determines the name of the event handler that appears in Relativity.
- The GUID attribute added above the class name in the code.
- The class is derived from the kCura.EventHandler.PreSaveEventHandler class.
- Override the RequiredFields property and return a new FieldCollection, which includes the Name field. This step ensures that the Name field is always available in the ActiveArtifact.Fields collection even when it isn't on the layout.

- Add the following code to using statement in Execute() method:
- Instantiates a new Response object with the Success property set to true, and the Message property set to an empty string.
- Retrieves the name of the current user who is logged in and the time.
- Creates a string containing the user and time data.
- Sets the Value property of the Name field in the ActiveArtifact.Fields collection equal to this string.
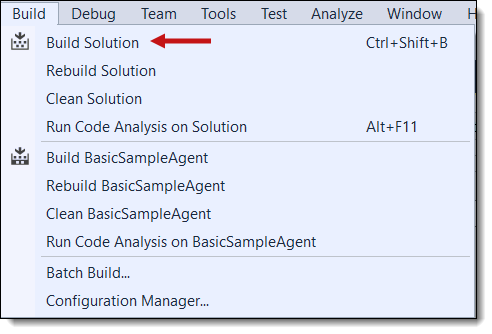
- On the Build tab for your project properties, ensure that you select Active (x64) in the Platform field. Relativity libraries require this setting.
- To compile your event handler source code, click Build > Build Solution. After your event handler assembly builds successfully, you can upload it to Relativity.
- Open the Relativity instance used for development.
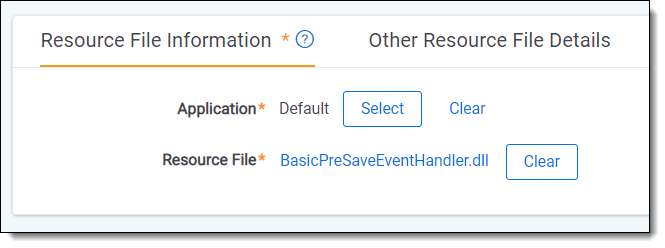
- Search for the Resource Files tab at the instance level.
- Click New Resource File.
- In the Application field, click Select to choose Default as the application. This action links your event assembly to the default application. In general, you link your assemblies to a custom application that you are developing.
- In the Resource File field, click Select File to choose the BasicPreSaveEventHandler.dll from the directory where you built the project.
- Click Save. You now have a new event handler type available for use in Relativity. In this example, you attach your event handler to an RDO so that you can execute it.
- Create a new Object Type called Basic Samples RDO in a Relativity workspace.
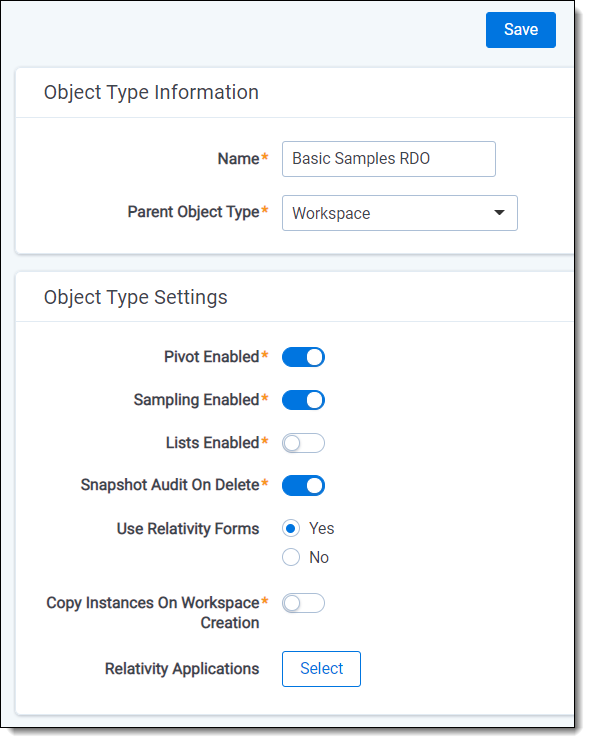
- Click Save to display the Event Handlers on Object Type associative list.
- To attach the event handler to your new object type, click New on the Event Handlers associative list.
- Select the BasicPreSaveEventHandler in the dialog box. After you attach your event handler, you can execute it in Relativity.

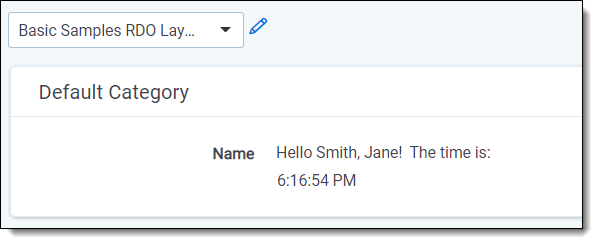
- To view your event handler execution, create a new instance of the Basic Samples RDO.
- In the Name field, enter Test RDO Instance.

- Click Save to trigger your Pre Save event handler. Your event handler updates the Name field to display the text: Hello <your name>! The time is: <time>.

Review the additional features of this code:
Copy
String yourName = this.Helper.GetAuthenticationManager().UserInfo.FullName;
String currentTimeString = DateTime.Now.ToLongTimeString();
String helloString =
String.Format("Hello {0}! The time is: {1}", yourName, currentTimeString);
kCura.EventHandler.Field nameField = this.ActiveArtifact.Fields["Name"];
nameField.Value.Value = helloString;You must override the Execute() method inherited from the base class. It contains the code with your business logic. In this example, the Execute() method works as follows:
Your code in the using statement in the Execute() method should be like the following sample:


You can create a new workspace or use an existing one when you deploy your event handler.