Creating and editing Relativity Objects
RDOs are object types that you create and manage from within any Relativity application. They help process and organize data. For example, you can assign information to them and create new data structures. You can also attach external applications such as event handlers and rules to extend their functionality.
Creating an object from a workspace
To create an object from a workspace:
- Navigate to the Object Type tab.
- Click the New Object Type button.
- Complete the fields on the Object Type Information panel.
- Click Save.
Creating an object from home
To create an object from home (note that only system admins can create objects in the Home area):
- Navigate to the Object Type tab. Alternatively, you can use the Search bar and select Object Type under Admin (Admin is the Home Object Type).

- Click the New Object Type button.
- Complete the fields on the Object Type Information panel.
- Click Save.
Deleting an object from a workspace
To delete an object from a workspace:
- Navigate to the Object Type tab.
- Select the checkbox next to the object you want to delete. You may select more than one object at a time.
- Select Delete from the Mass Operations menu near the bottom left of the page.
- Click Go.
A confirmation dialog displays. If the object has any dependencies, the Dependencies button is active. - Click Delete.
Deleting an object from home
To delete an object from Home:
- Navigate to the Object Type tab. Only system admins can delete objects in this area.
- Select the checkbox next to the object you want to delete. You may select more than one object at a time.
- Select Delete from the Mass Operations menu near the bottom left of the page.
- Click Go.
A confirmation dialog displays. If the object has any dependencies, the Dependencies button is active. - Click Delete.
Editing an object's details
For every Relativity object, you can view details about it, as well as change certain characteristics such as permitting pivot or sampling. Some objects may have additional restrictions or allowances, such as associating them with event handlers, object rules, and mass operations. The following screen shot shows a typical Object Type details page.
")
The objects details page appears in one of two ways:
- When you create a new object type. The details page appears after you click Save on the Object Type form for a newly created object. See Creating an object from a workspace
- In the object type list. Click the object's name from the Object Type object list. Clicking Edit partially displays the details page, but the additional actions of event handlers, rules, or mass operations do not appear.
The information page displays in two parts. The first part displays the Action bar near the top of the page followed by several categories about the object type settings.
You can use the Action buttons near the top of this page to perform these tasks:
- Edit - edits certain object type details. You can't change some details after you create an object.
- Delete - removes the object type from Relativity. After you click Delete, a confirmation message appears. If the object has dependencies, that is, the object uses or links with other objects, the Dependencies button is active. See Deleting object dependencies.
- Back - redirects you back to the Object Type list page.
- Edit Permissions - opens a window that lets you set access rights on the object. These rights modify only the security for the current object. The object is secured with the following default rights:
- If you created the object within a workspace, it inherits workspace-level rights, unless it inherits permissions from a parent object.
- If you created the object within Home, it inherits the client rights, unless it inherits permissions from a parent object.
- View Audit - displays the update history for the object type.
The second part displays additional actions that you can attach to the RDO. Not all RDOs will have additional actions, and only the available actions appear. Before adding any actions, consult your system admin. When present, you can attach the following actions:
- Event Handlers - adds special functionality or conditions to layouts. See Adding an event handler.
- Rules - adds special functionality or conditions with user configurable options to layouts. See Adding an object rule.
- Mass Operations - provides the ability to add functionality for mass operations using mass operation handlers or custom pages. See Adding a custom mass operation.
Fields for an object type
When creating or editing an object, the fields display in the following sections:
Object Type Information section
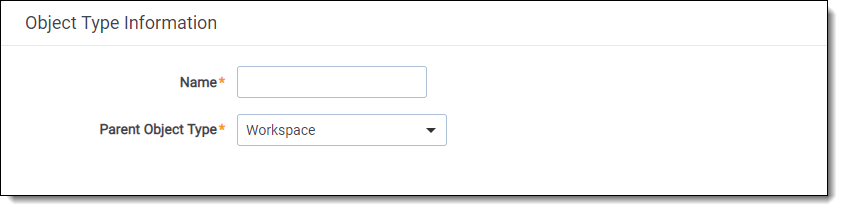
- Name - the name of the object.
- Parent Object Type - select the object type the object links to. That is, the object that you are creating is a child of the selected object type. The list of available parent objects displays in the drop-down menu.
Object Type Settings section
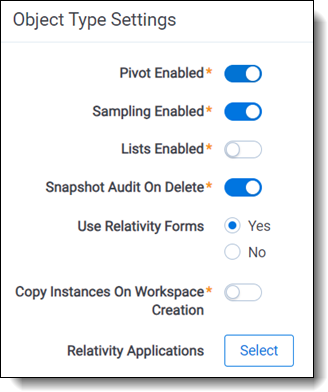
- Pivot Enabled - enables or disables pivot functionality on the object. The default value is Enabled, which displays the Pivot icon on the object tab. Disable this option to remove the icon from the object tab.
- Sampling Enabled - determines if sampling functionality is enabled on the object you are creating or editing. The default is Enabled for a new RDO. It is also enabled for the Document object, which means you can create a sample of documents for QC purposes using the settings in the sampling menu.
- Disabled - hides the sampling menu on the object you are creating or editing.
- Enabled - displays the sampling menu on the object you are creating or editing.
- Lists Enabled - determines if the user has the ability to save a list of this object's items as a persistent list.
- Disabled - hides the Persistent Lists icon on the object you are creating or editing.
- Enabled - makes the Persistent Lists icon available on the object you are creating or editing.
- Snapshot Auditing On Delete - captures audit information about the values stored in object fields. The following options are available:
- Enabled - the default setting, which results in Relativity capturing a snapshot of the current field values for the object. By capturing this data, the size of the delete audit record increases, but the field values are available when querying the workspace history.
- Disabled - indicates that Relativity deletes the object without capturing its field values.
- Use Relativity Forms - determines whether this type's Layouts are rendered using the Relativity Forms engine, the preferred Layout-rendering option, providing the developer with robust JavaScript APIs and a granular front-end page life cycle for easier, more controlled Relativity Object customization. For more information, see
- Yes - use Relativity Forms to render the Layout (view, edit, and new) pages for objects of this type. This option is selected by default.
- No - do not use Relativity Forms for objects of this type.
- Copy Instances On Workspace Creation - determines whether Relativity copies instance of an object when you create a workspace. Relativity copies RDOs from the template workspace regardless of this field's value. Copy Instances On Workspace Creation only controls whether or not Relativity copies object instances to the new workspace. Consider the following when setting this value:
- If the template workspace contains an object with Copy Instances On Workspace Creation set to Yes, but one of its associative objects has this same field set to No, the instances are unlinked from the object. The new workspace copies the object type, but none of the instances.
- An instance of an object type doesn't copy if its parent object is set to No.
- An instance of an object type doesn't copy if its parent object contains a File field.
- You can't copy instances if the template workspace contains an object that is associated with a Document object.
- Copy Instances On Parent Copy - copies all child objects when the parent object is copied. This option only copies child objects that do not have Workspace as their parent object. This option is also disabled on parent objects.
- Enabled - copies all child objects if the parent object is copied.
- Disabled - does not copy any child objects attached to the parent object.
- Relativity Applications - associates the object type with an application created on the Relativity Applications tab. Click the Select button to select an existing application. To use this option, you must have the permission Manage Relativity Applications in the Admin Operations section of the Security page.
Other section
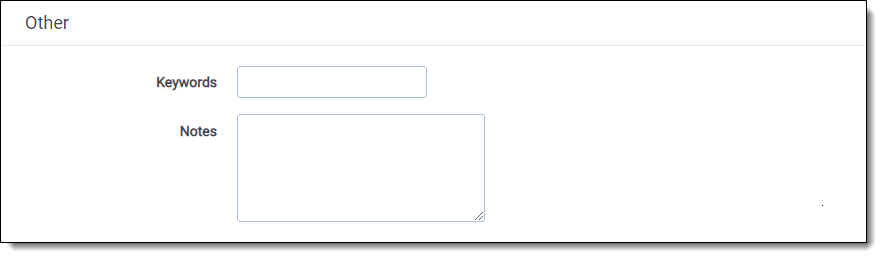
- Keywords - filters on the object type in a view, as well as for other identification purposes.
- Notes - enter additional comments about the object type.
Adding an event handler
An event handler is a process or action that attaches to an RDO. The event handler permits special or additional functions but without user configurable options. It introduces restrictions, limitations, or addition actions. It activates explicitly on a user event, such as clicking a specific button, or implicitly such as receiving a message or when the user encounters a data limitation.. You may need to consult your system admin for additional information.
You can add an event handler at the time you create an RDO or edit an object. To add an event handler:
- Create an RDO or see the Editing an object's details section.
- Click New in the Event Handlers category on the Object Type Details page.
The Select Event Handlers dialog appears. All the available event handlers display as DLL files.
- Select the checkbox for each event handler that you want to add.
The list may contain several event handlers with the same name, so select one with the appropriate execution type and application. You may need to consult your system admin for additional information. - Click OK.
The event handler file name appears in the DLL column. Its action becomes immediately available and will execute the next time the event occurs.
Deleting an event handler
To delete an event handler:
- Click the name of an object to display the Object Type Details page.
- Select each event handler that you want to delete.
- Click Delete in the Event Handlers' category.
- Confirm the action by clicking OK.
Adding an object rule
An object rule is a Relativity-provided action that permits special or additional functions with user-configurable options. An example is the New Button Override that redirects an object's New button action to another Relativity page or other URL as directed by the user.
Permissions do not control restrictions or allowances granted by an object rule. For example, if the object rule Mass Action Visibility hides the Edit option in the Mass Actions menu, adjusting permissions does not make that option visible. In the same way, if that rule shows the Edit option, removing permissions does not hide it.
To add an object rule:
- Create an RDO or display the Editing an object's details page.
- Click New in the Rules category.
The Add New Rule pop-up displays. - Select the Rule Type.
Each Rule Type has a unique set of conditions or configuration listed individually. - Complete the fields for the selected Rule Type.
- Click Save.
The following object rule types are available:
- Choice Behavior
- Custom Single Object Add Link Visibility
- Default Layout
- Default Layout on New
- Global Button Visibility
- Mass Action Visibility
- New Button Override
- Override edit link URL
- Override view link URL
- Sub-List Button Visibility
Default Layout
The Default Layout rule determines which layout a reviewer sees by default, or if the reviewer can see any layout at all. One default layout displays per document. If there are multiple default layouts for a single document, Relativity will select the default layout with the lowest Artifact ID to display. To change the default layout for a document, create a new default layout with a lower numbered Artifact ID than the current default.

The field choices are:
- Rule Type - specifies using a default layout.
- Name - the name for the rule.
- Field - the field that drives the rule behavior. The drop-down list contains the complete set of fields available.
- Value - the field value that drives the rule behavior. The drop-down list contains the complete set of values available for the selected field.
- Layout - the layout that displays based on the Field and Value conditions. The drop-down list contains the complete set of layouts available for the parent object.
- User can select another layout - determines the layouts reviewers can see.
- If checked, reviewers see the layout selected in the Action field by default. They are also able to move to another layout.
- If not checked, reviewers see only the layout selection in the Action field.
Custom Single Object Add Link Visibility
You can control the availability of the Add link button to add RDO instances to existing custom single objects from a layout.
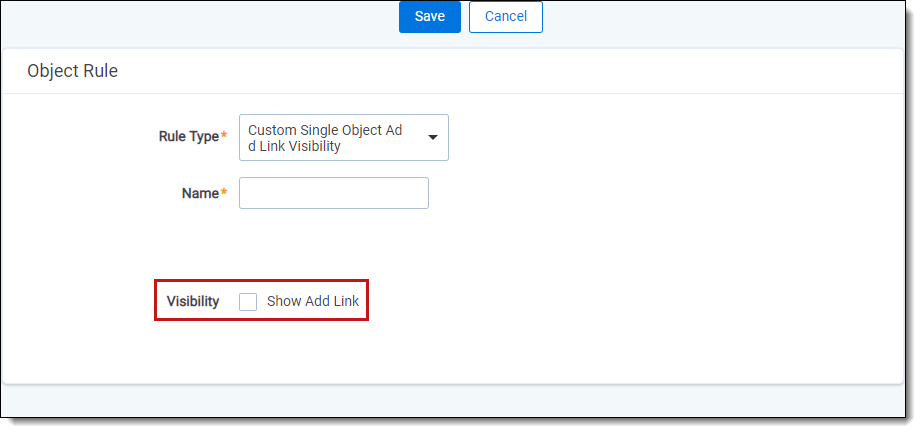
The field choices are:
- Custom Single Object Add Link Visibility - controls availability of the Add link to add object instances to existing objects from a layout. When you apply the Custom Single Object Add Link Visibility object rule to an object, clearing the Show Add Link checkbox means that the Add link won't display the custom single object field pointing to that object, and you won't be able to add object instances from a layout.
- Name - the name for the rule.
- Visibility - determines if the Add link is visible for the object.
- If checked, the Add link is visible.
- If not checked, the Add link is not visible.
System single object fields and custom single object fields of Document object type don't display the Add link.
Default Layout on New
You can determine which layout displays when a user creates a new custom object.
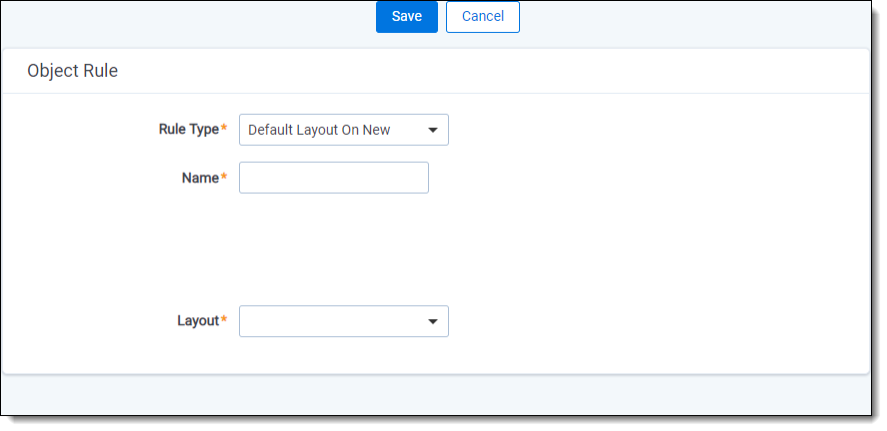
The field choices are:
- Default Layout on New - determines which layout displays when a user creates a new custom object.
- Name - the designation used to identify the rule. This is the friendly name for the rule.
- Layout - determines which layout displays by default.
Global Button Visibility
You can determine the visibility of specific buttons or action options available on an object type.
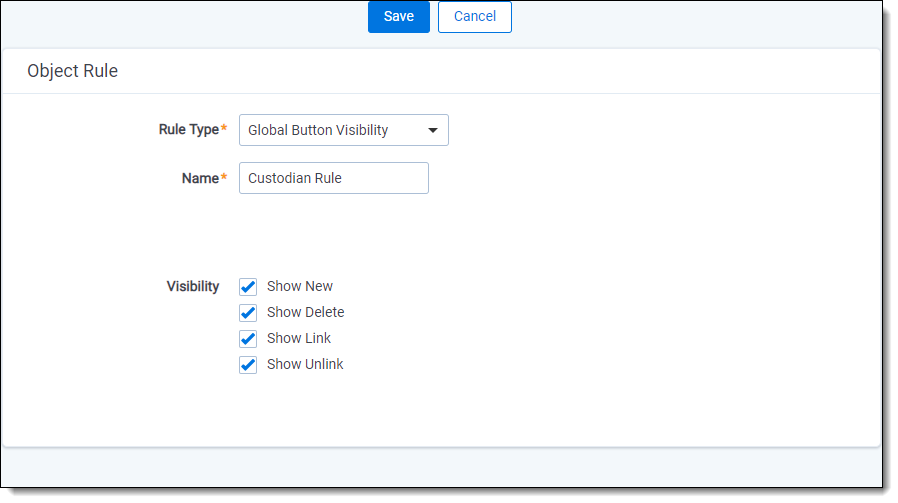
The field choices are:
- Global Button Visibility - determines the visibility of specific buttons or action options available on an object type.
- Name - the name for the rule.
- Visibility - determines the visibility of specific buttons or action options available for an object type.A Sub-List Button Visibility rule overrides a Global Button Visibility rule when a conflict occurs between the two.
The following table outlines the effect of clearing each Visibility checkbox.
| Visibility Option | When You Clear this Check box: |
|---|---|
| Show New |
The following options do not display:
|
| Show Delete |
The following options do not display:
|
| Show Link | The Link button doesn't display on associative objects lists added to the layout of another object associated by a multiple or single object field to the current object type. |
| Show Unlink | The Unlink button doesn't display on associative objects lists added to the layout of another object associated by a multiple or single object field to the current object type. |
Mass Action Visibility
You can control the visibility of buttons for the mass operations for an object type.
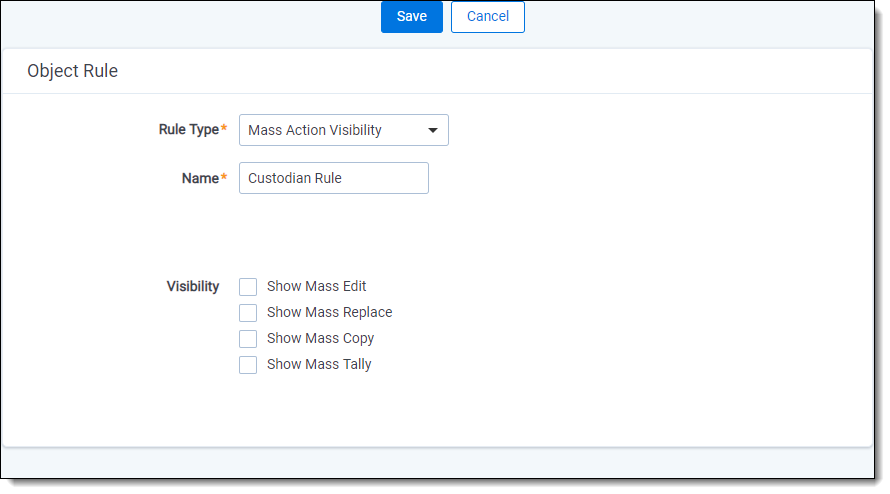
The field choices are:
- Mass Action Visibility controls the visibility of the Edit, Replace, Copy and Tally/Sum/Average mass operations for an object type.
- Name - the name for the rule.
- Visibility - determines the visibility of specific buttons or action options available on an object type. When you add a Mass Action Visibility rule, the visibility check boxes are clear by default. If you don't select the visibility check box for a given mass operation, then that option won't be available in the mass operations drop-down list for the object.If the object has a Global Button Visibility rule with the Show New visibility option disabled, then the Copy mass operation doesn't display even if the Show Copy check box is selected.
Choice Behavior
You can control whether the users can add or delete choices for fields.
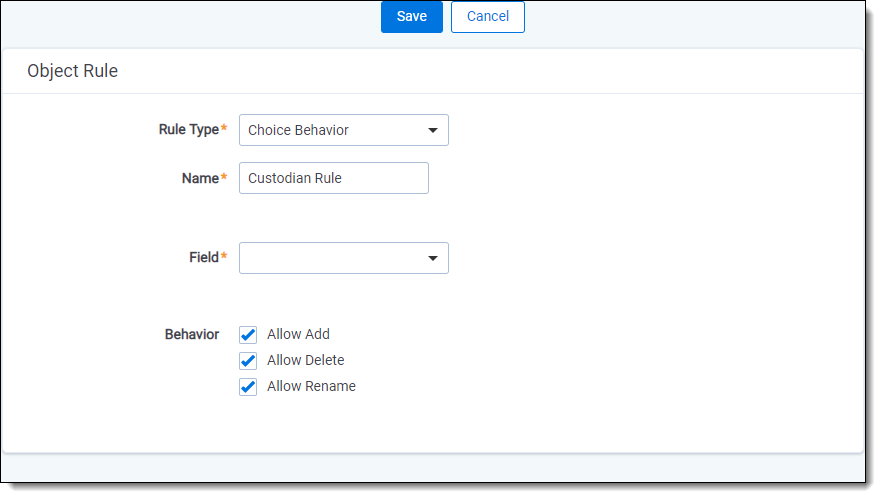
The field choices are:
- Choice Behavior - controls whether your users can add or delete choices for fields.
- Name - the name for the rule.
- Field - the field the choice behaviors affect.
- Behavior - which actions apply to the choices.
The following table describes the expected behavior when applying a Choice Behavior object rule to a single- or multiple-choice field.
| Behavior | When you clear this checkbox: |
|---|---|
| Allow Add |
|
| Allow Delete |
|
| Allow Rename |
|
Sub-List Button Visibility
You can provide granular control over the display of the buttons for child and associative object lists.
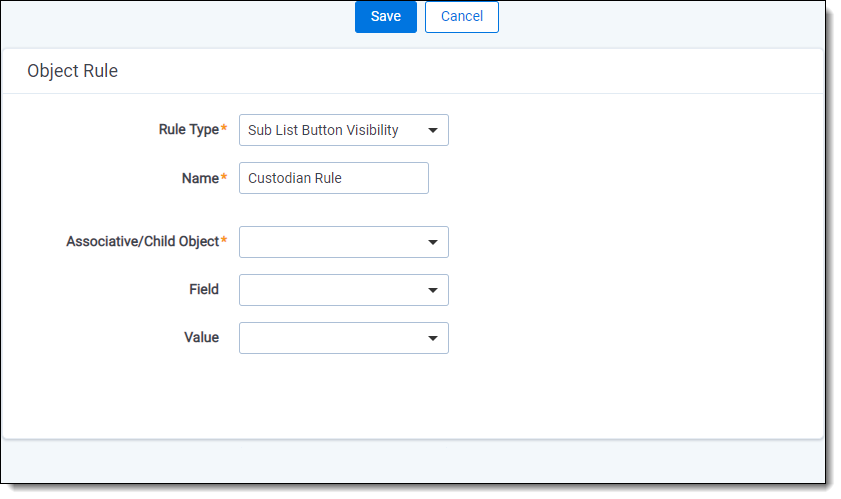
The field choices are:
- Sub-List Button Visibility - provides granular control over the display of the buttons for child and associative object lists. You can define a condition that determines the availability of these options, or you can create a rule that targets these options for a specific associative or child list without defining any condition.
- Name - the name for the rule.
- Associative/Child Object - displays all child or associative objects lists for the object type. You control the button visibility for this object type.
- Field - optional field setting a condition for controlling the display of the Visibility options. Only single choice fields appear in the Field drop-down menu.
- Field and Value - specifies the value of the selected field that affects the button visibility.
- Visibility - the list of options controlling the display of specific buttons. The list of button options depends on the Associative/Child Object type:
- If Associative/Child Object is a child object list, only the Show New and Show Delete options display.
- If Associative/Child Object is an associative object list, only the Show New, Show Link, and Show Unlink options display.
The following table describes how to hide a button by clearing its Visibility checkbox. If Field and Value are blank, the buttons are always hidden or displayed, depending on the selected checkboxes.
| Visibility Option | When you clear this checkbox: |
|---|---|
| Show New |
The New button doesn't display on the list selected in the Associative/Child Object option. |
| Show Delete | The Delete button doesn't display on the child object list selected in the Associative/Child Object option. |
| Show Link | The Link button doesn't display on the associative object list selected in the Associative/Child Object option. |
| Show Unlink | The Unlink button doesn't display on the associative object list selected in the Associative/Child Object option. |
New Button Override
You can override the page that displays by default when clicking New on the object page. Enter a URL in the Link field. Clicking New on the object page bypasses the default edit page and launches this URL.
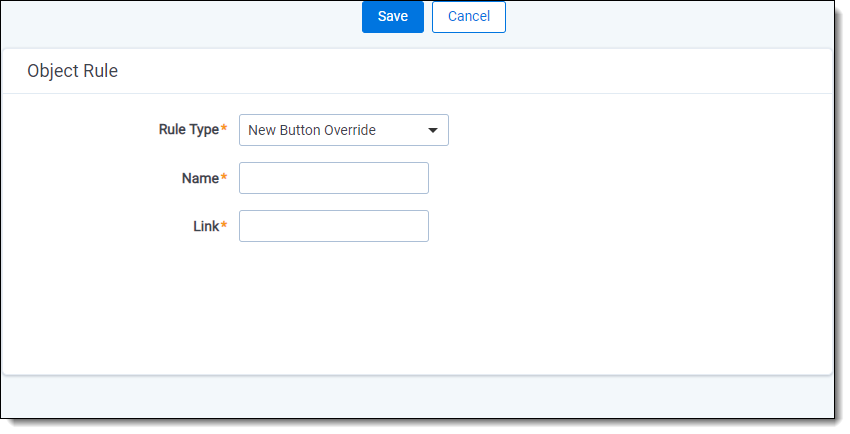
The field choices are:
- New Button Override - overrides the page displayed by default when clicking the New button on the object page.
- Name - the name for the rule.
- Link - the URL when you click New. This follows the standard URL notation.
The link double encodes the text so if you use text replacements, you have to also include in the DirectTo definition the ASCII character hex values for symbols. Common symbols include:
- %25 for "%"
- %2f for "/"
- %3f for "?"
See Example 2 for a sample usage.
As an alternative to using text replacement, copy and paste the URL of the destination page into the Link value.
Examples:
- You are creating an RDO. In order to complete the fields properly, you would like users and developers to read your documentation about that object. Use a Link value like this (but specific to your actual page): https://www.example.com/CustomObjectInformation.
- You are creating an RDO. You want users to go to a Relativity custom page instead of the standard new object page. This example uses the GUID of the object. Use a Link value like this (but specific to your actual page): %applicationPath%/External.aspx?%AppID%&DirectTo=%25applicationPath%25%2fCustomPages%2f1601ea45-5ac3-47f0-92e7-92f04fe91e91%2f%3f%25AppID%25&SelectedTab=1044864.
Override edit link URL
You can override the page that displays by default when clicking the edit link on the object page. In some cases you may need to customize an RDO's view page, perhaps to include a custom page or an external web site. You can use this control to override the standard view URL and specify your own page or destination. As an example, the authentication's provider method view page uses custom controls and overrides the standard edit links.
Enter a URL in the Link field. Clicking Edit on the object page bypasses the default edit page and launches this URL.
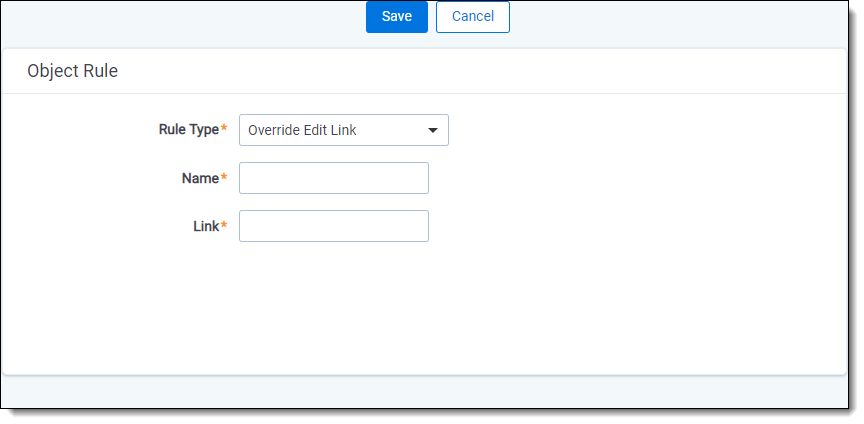
The field choices are:
- Rule Type - select Override Edit Link URL to override the default page that appears when clicking the Edit link on the object page.
- Name - specifies the name for the rule. This names appears in the Parent Object Type field of the Object Type view list.
- Link - specifies the URL when you click the Edit link. This follows the standard URL notation.
Override view link URL
You can override the page that displays by default when clicking the object name link on the object page. In some cases you may need to customize an RDO's view page, perhaps to include a custom page or an external web site. You can use this control to override the standard view URL and specify your own page or destination. As an example, the authentication's provider method view page uses custom controls and overrides the standard view links.
Enter a URL in the Link field. Clicking the object name on the object page bypasses the default view page and launches this URL.

The field choices are:
- Rule Type - select Override View Link URL to override the default page that appears when clicking the object name on the object page.
- Name - specifies the name for the rule. This names appears in the Parent Object Type field of the Object Type view list.
- Link - specifies the URL when you click the object name. This follows the standard URL notation.
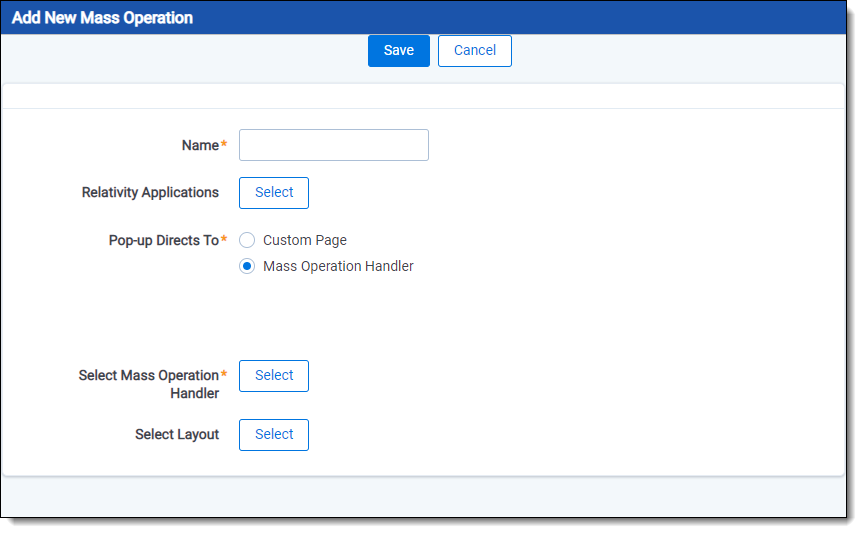
Adding a custom mass operation
You can associate a custom mass operation with your new object type.
For example, you can create a custom page that appears when the user runs the custom mass operation, or you can develop your own mass operation handler assembly that uses a standard Relativity layout. For more information, see Mass Operation handlers or Custom pages in the Relativity Server 2022 Developers site.
Note: Relativity adds your custom mass operation to the Mass Actions section of the security page for a workspace. You can control the groups with access to the mass operation from this page. By default, all groups have access to your custom mass operation unless you restrict them from using it.
Use the following procedure to add a mass operation:
- Click New in the Mass Operations category on the Object Type Information page.

- Complete the fields on the Add New Mass Operation dialog. See Mass operation fields.
- Click Save.
Mass operation fields
- Name - determines the name of the mass operation that appears in the Relativity user interface.
- Relativity Applications - links the mass operation to one or more applications. The Select Item dialog lists only applications that are currently unlocked. Relativity displays the mass operation on the details view of any applications that you select. This mass operation is also included in an application when you lock or export it.If you are adding a mass operation that uses a mass operation handler, you should select only one application. This application must include the assembly that contains the class with the code for the mass operation. Failure to use the appropriate application causes an error. To view this error, click Show Errors in the Relativity Application console on the application details view.
If your mass operation requires a custom page tied to a specific application, you should select this application. For custom pages, you need to verify that the URL or page works properly, since you won't see an error if you select a mass operation that isn't tied to the domain. - Pop-up Directs To - select one of the following and then complete the additional fields for your selection.
- Custom Page - select a custom page as the target for the mass operation. See Additional fields for custom pages.
- Mass Operation Handler - select a mass operations handler as the target for the mass operation. See Additional fields for mass operation handler.
Additional fields for custom pages
When you select Custom Page, Relativity displays the following additional fields:
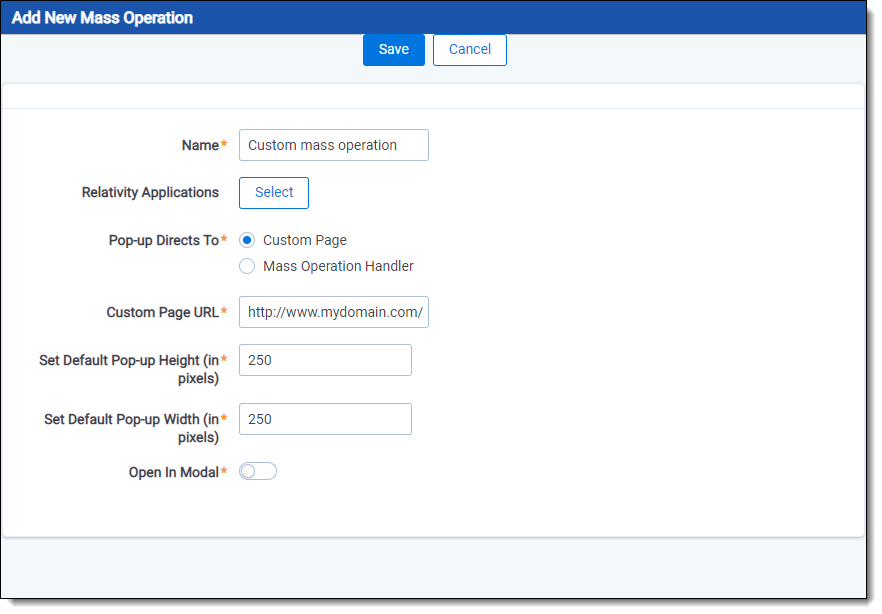
- Custom Page URL - indicates the URL of the page after clicking Go on the mass operations bar. When you develop your mass operation, you can create your own custom page or use the Relativity custom page framework. For more information, see
- Set Default Pop-up Height (in pixels) - indicates the number of pixels used to display the height of the custom page. The default value is 250 pixels.
- Set Default Pop-up Width (in pixels) - indicates the number of pixels used to display the width of the custom page. The default value is 250 pixels.
Additional fields for mass operation handler
When you select Mass Operation Handler, Relativity displays the following additional fields:
- Select Mass Operation Handler - click the Select button to choose an assembly containing the class that provides functionality for your mass operation. When you select a mass operation handler, make sure that it is associated with the correct Relativity Application. Check the Application Name column on the Select Mass Operation dialog to confirm that you have the correct handler. If you aren’t using a mass operation for a specific application, you can select one associated with the Default application. You may also check with your system admin for additional details.
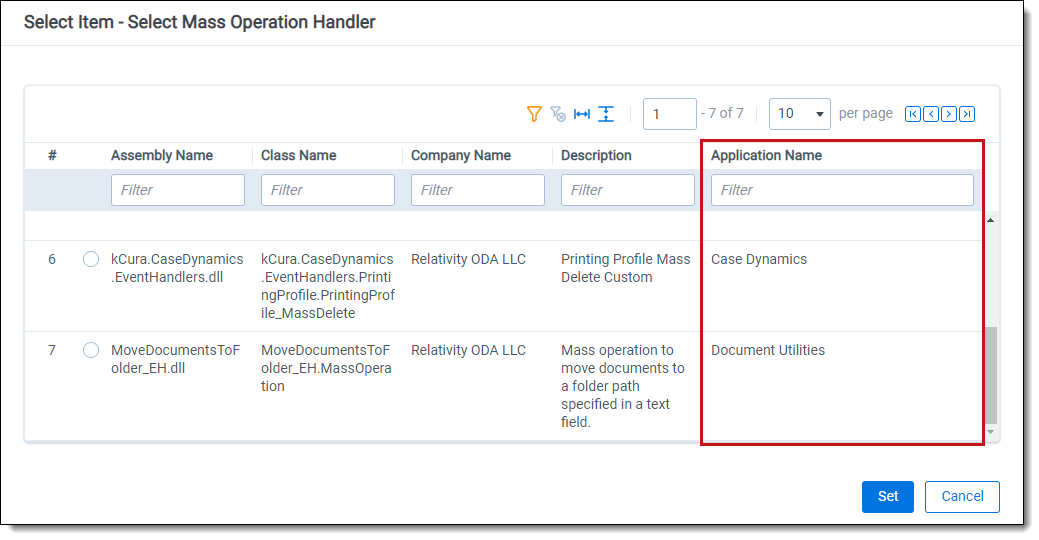
To display your custom mass operation handlers in this list, add them to Relativity as resource files. For more information, see - Select Layout - click the Select button to choose the layout that appears after the user clicks Go on the mass operations bar. You can define custom layouts for your mass operations on this object type. When you create a layout, select your new object type in the Object Type field.
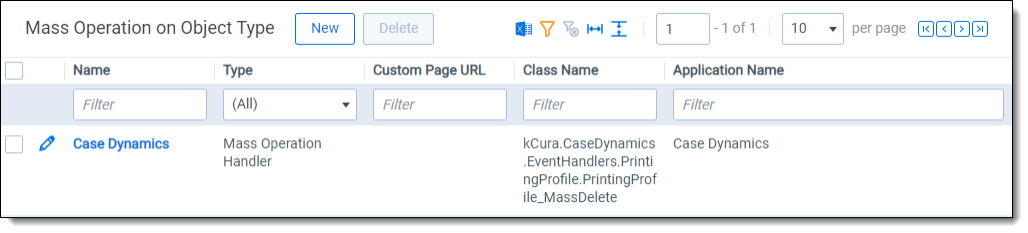
After you click Save, the Class Name column in the Mass operations section displays the class containing the code for the handler. The Application Name column displays the application domain where the assembly containing the class for handler has been loaded.
Adding information to objects
You can add information to Dynamic Objects in the same way you add information to documents in Relativity. In addition, you can export this information to an external file.
A new object has defaults for fields, a view, and a layout. You can add fields to Dynamic Objects and place those fields on layouts and views.
