Set up a developer environment
Use the steps in the following sections to set up your developer environment using a DevVM. Plan the following time for completing these tasks:
- Setup time for Community accounts, which may take at least 1-2 business days for the approval process. You need to complete this process to download your DevVM.
- Download time for a DevVM depends on the speed of your internet connection.
- Setup time for Hyper-V is 30 minutes.
System requirements for a DevVM
To set up a DevVM, your local machine must meet the following system requirements.
| Minimum configuration | Recommended configuration | |
|---|---|---|
| Operating system |
|
|
| Storage space | 140 GB | |
| Processing cores | 3 | 4 |
| RAM | 12 GB | 16 GB |
| Relativity version | 12.2.224.7 | |
| Visual Studio | 2019 |
Step 1 - Install the Relativity Visual Studio templates
Use these steps to install the Relativity templates through Visual Studio:
Note: Relativity templates are only supported in VS2017 or VS2019.
- Open Visual Studio 2017 or 2019.
-
Click Extensions > Manage Extensions in the menu bar.
(Click to expand)
- In the Manage Extensions dialog, complete these steps:
- Close Visual Studio. The VSIX installer automatically opens.
- Complete the steps in the VSIX installer to install the templates.
Step 2 - Set up Relativity Community and DevHelp accounts
Begin your Relativity development experience by setting up the following accounts:
- Relativity Developer Community - set up a Community account to interact with the Relativity Developer community.
Note: You can also download a DevVM through the Relativity Developer Community.
- Relativity DevHelp Community - set up an account to ask questions, obtain suggestions from other Relativity Developers, and stay updated about Relativity news.
Use the following steps to create your accounts:
- Create a Relativity Developer Community account by completing these steps:
- Fill out the Relativity Developer Community account form.
- Click the password change link and set your password.
- Log in to the Relativity Community portal.
- Click Groups in the navigation bar to join the Relativity Developer Group.
- Click Relativity Developer Group.
- Click + Join Group to be added to the group.
Note: After your Relativity Developer Community account is approved, you can use the Relativity DevHelp Community and download a DevVM. Allow at least 1-2 business days for the approval process.
- Create a Relativity DevHelp Community account by completing these steps:
- Go to the Relativity DevHelp Community page.
- Click Sign Up to create a new account.
- Complete the create account form.
Be sure to enter the same email address in form as you used when creating your Relativity Developer Community account.
Step 3 - Download a DevVM
After your Relativity Community account is approved, you can download a DevVM.
Note: A DevVM is approximately 40 GB. The amount of time to download a DevVM varies by the speed of your internet connection.
Use the following steps to download a DevVM:
- Log in to the Relativity Community.
- Search for a knowledge base article for a recent DevVM version using the format: DevVM - <version number>.
For example, you enter DevVM - 12.2.224.7.
- Locate the Download Files section at the bottom of page.
- Click the link to download DevVM.
- Set up the DevVM using the steps in Set up the DevVM in Hyper-V.
Step 4 - Set up the DevVM in Hyper-V
You need to set up your DevVM in Hyper-V because it uses this software to run the Relativity instance.
Use the following steps to set up your DevVM:
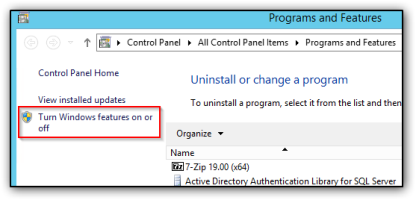
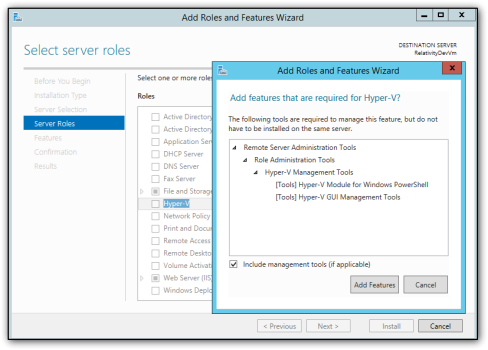
- Complete these steps to verify that Hyper-V is installed on your local machine:
- Extract the contents of the zip file downloaded from the Relativity Community.
See Download a DevVM. - Copy the RelativityDevVm folder to the C: drive on your machine.
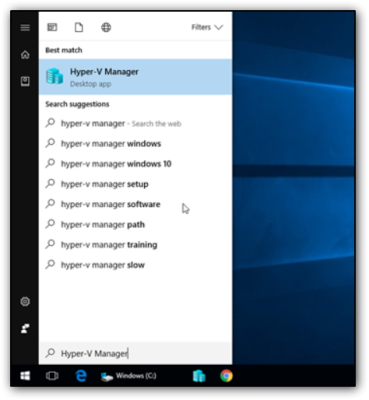
- Open the Hyper-V Manager application.
(Click to expand)
- Select your local machine under Hyper-V Manager in the tree.
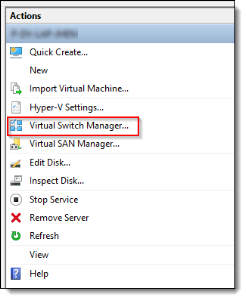
- In the Actions pane, click Virtual Switch Manager.
(Click to expand)
- Complete these steps if you don't have an external network switch:
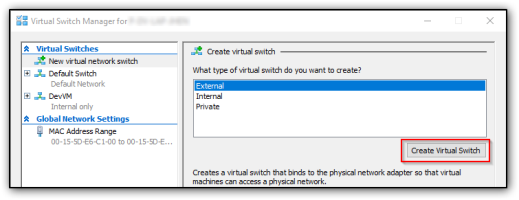
- Click New Virtual Network Switch under Virtual Switches.
- Select External for the switch type.
- Click Create Virtual Switch.
- Enter an unfriendly name, such as RelativityDevVmSwitch.
- Click Apply.
(Click to expand)
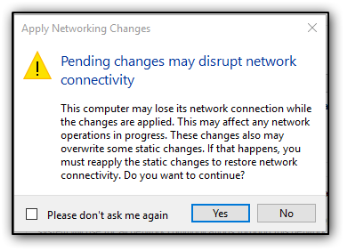
- If a warning message appears, click Yes.
(Click to expand)
- Click OK to create a new virtual switch.
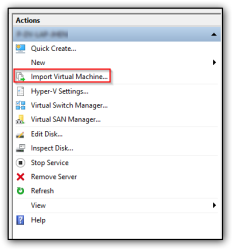
- Import the VM by clicking Import Virtual Machine in the Hyper-V Manager.
(Click to expand)
- Click Next.
- Click Locate Folder.
- Click Browse to locate the RelativityDevVm folder.
- Click Select Folder.
- Click Next.
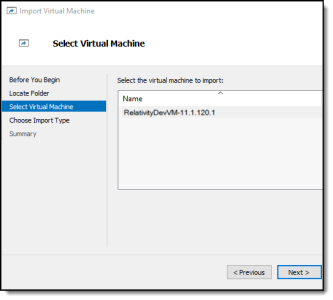
- On the Select Virtual Machine window, verify that the Hyper-V VM is displayed, and click Next.
If you don't see your machine listed, see Cannot import DevVM post on the DevHelp site.
(Click to expand)
- On the Choose Import Type window, select Register the virtual machine in-place, and use the existing unique ID.
Note: In Connect Network section, a warning may appear if the DevVM requires a different virtual switch. Choose a valid virtual switch from the Connection drop-down list.
- Click Next.
- Click Finish to import the new Hyper-V VM.
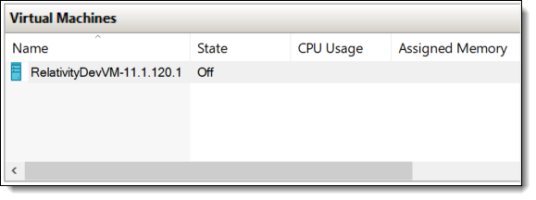
You should now see the imported VM in the Virtual Machines section.(Click to expand)
- Right-click VM instance and then click Start.
Note: After you start your DevVM, it may take several minutes for all the services to begin running.
Step 5 - Obtain your credentials and Relativity license
Complete these tasks to obtain your credentials and Relativity license:
Credentials for a DevVM
Obtain the credentials for a DevVM on the Relativity Community site at Where can I access DevVM Credentials? You use these credentials to interact with various features of the DevVM.
Relativity license
When you initially log in to the Relativity instance on your DevVM, you are prompted enter a license key. See Connect to a Relativity instance on a DevVM.
Contact Relativity Support to request a license key for your DevVM:
- Select Relativity Server as the Product and Other for the Instance and Topic fields, and Service Request as the nature of your request. In the ticket description, indicate that you are requesting a license for a Relativity instance on a DevVM.
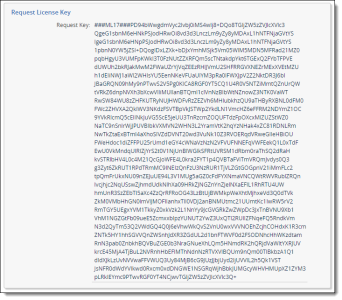
- Copy the key displayed when you first attempt to log in to Relativity and attach the request key to the support ticket as a text file. The following screen shot illustrates how this key is displayed:
If you can't log in to your Relativity instance, make sure that the kCura Service Host Manager service is running within the DevVM. See the following screen shot. 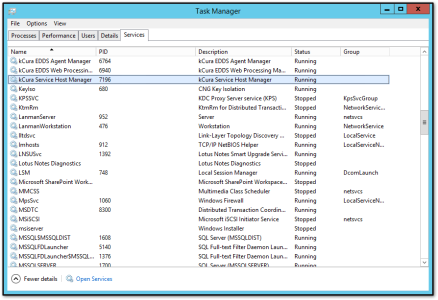
Note: The kCura EDDS services may not be running yet, this is because you need a valid Relativity license to start those services. After you have updated the license key with the key provided by Relativity support, return to service manager and start the two kCura EDDS services.
Additional information about DevVMs
Review the following information to simplify working with your DevVM.
Saving versus stopping your DevVM
Save your DevVM instead of shutting it down. This action puts the DevVM in a hibernated state. When starting the DevVM after saving it, you won't have to start the services again, because the state of your DevVM is preserved. It also reduces the time necessary to set up the DevVM when you restart it. To save your DevVM, right-click on the DevVM in the Hyper-V Manager and click Save.
Connect to a Relativity instance on a DevVM
Use the following steps to connect to the Relativity instance on your DevVM:
- Locate the IP address for your DevVM in the Hyper-V Manager.
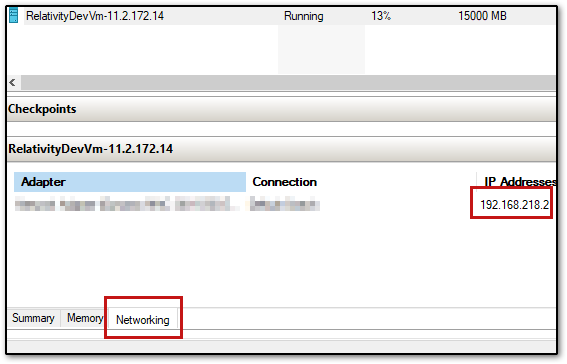
- Replace 9.9.9.9 in the following URL with the IP address from your machine.
You can then use this URL to connect to your Relativity instance in the web browser.
Copyhttp://9.9.9.9/Relativity - Obtain your credentials for logging in to your Relativity instance from the Relativity Community. For more information, see Credentials for a DevVM.
Updates resources for a DevVM
Note: Even though you can adjust the system resources, we don't recommend using these environments for performance testing, gathering metrics, or other similar purposes.
Use the following steps to update the resources for a DevVM:
- Shutdown the DevVM.
- In the Hyper-V Manager, right-click on the DevVM and click Settings.

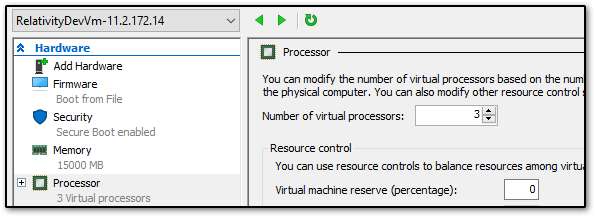
- Increase the number of processor cores by clicking the Processor link in the Hardware section, and enter a value in the Number of virtual processors field.
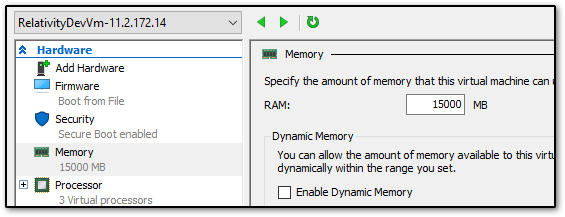
- Increase the RAM by clicking the Memory link in the Hardware section and enter a value in the RAM field.
-
Click Apply > OK after configuring the VM hardware.
Windows licensing
A DevVM has a Windows license for up to 180 days. If you continue using the DevVM beyond this timeframe, you must activate a Windows license on the machine. For information, see Evaluation Versions and Upgrade Options for Windows Server 2012 on the Microsoft web site.
Use these steps to activate a license:
- Start your DevVM and log in to it with your credentials. See Step 5 - Obtain your credentials and Relativity license.
- Click
 on the taskbar in your DevVM to run PowerShell as an administrator.
 - Run the following command:Copy
DISM /online /Set-Edition:ServerStandard /ProductKey:XXXXX-XXXXX-XXXXX-XXXXX-XXXXX /AcceptEulaAdd your Windows Server 2012 R2 license key to the command by updating the placeholder value in the ProductKey field.
Note: You must obtain your own Windows Server 2012 R2 license key.


