Build your first application
Relativity applications (RAPs) are custom developed applications that utilize Relativity’s APIs to perform certain functions or solve specific problems. You can build applications that extend Relativity by using the Application Deployment System (ADS). ADS provides a framework for application development by helping you leverage existing functionality in Relativity, such as views, layouts, and other features. It also simplifies the packaging of custom code. You can upload this custom code to Relativity and associate it with an application that you create through the Relativity UI. When you finish developing your application, you can then export the RAP file for installation on other Relativity instances or in specific workspaces.
This topic explains why and when to create a Relativity application and walks you through how to create your first application.
This page contains the following information:
- Why create a Relativity application
- When to build a Relativity application
- Application development tools
- Building your first application
Why create a Relativity application
Reasons why you might want to create a Relativity application include:
- Build simple workflows - the Relativity platform provides functionality to support the needs of your organization without requiring extensive IT resources. Project managers, business analysts, and other users can build simple workflow applications, which track key data points on your cases. For example, you can create custom RDOs that store data about the receipt or shipping of media, custodians associated with a matter, external contractors assigned to a matter, and other project management tasks.
- Automate processes - you can customize your Relativity instance to reduce expenditures by automating processes, such as workspace creation or quality assurance tasks. For example, the Relativity platform includes a specialized event handler that you can use to add or modify database tables during workspace creation. You can incorporate these event handlers that contain your custom code into any new applications that you develop.
- Create custom reports - you can leverage platform extensibility options by writing applications to enhance the functionality available in Relativity. You can create solutions that build customized reports, summarize review statistics or billing data, and send them out by e-mail. An additional option includes the development of event handlers designed to automate or streamline various stages of the review process by specific user types.
- Versioning - by utilizing RAPs, developers gain access to Relativity’s versioning system. This allows developers to manage multiple versions of an application for deployment amongst varying environments as needed, instead of having to redeploy the proper assembles and rebuild the application each time.
- Deployment - the use of ADS & RAPs greatly increases the ease of application deployment and re-use. Relativity applications often consist of many Relativity components – such as agents, event handlers, custom pages, tabs, layouts, and more. Typically, these components have to be added manually in the environment to work with the code you’ve developed and uploaded. Re-creating the same artifacts in each environment manually is a time-consuming task, but ADS & RAPs provide an efficient alternative. By adding your Relativity artifacts to a RAP, you are creating a re-useable package that can be shared across environments. Artifacts that are added to a RAP are automatically unpacked into the target workspace when the RAP is installed.
- GUIDs - when utilizing RAPs, developers gain access to GUIDs that uniquely identify the different components in the application. These GUIDs can be used in code to refer to artifacts for CRUDQ operations. The real benefit of GUIDs, however, is the aspect of reusability they provide. Component GUID values are retained when you export your application and import it to another environment. This allows developers to write “environment agnostic” code for the applications and ensures there will be no conflicts with artifact names or artifact IDs when deploying the application to a new environment.
- App Hub - Relativity features applications on it's site. This is a great resource for both aspiring and established developers for marketing an application they’ve created. You can work with our Developer Experience team to get your Relativity Application feature on the app hub. For more information, see Relativity App Hub and contact devex@relativity.com.
When to build a Relativity application
Consider building an application if
- You need to create a one-off customization in a Workspace that you’re confident may be re-used in other Workspaces or other Relativity Instances.
- You are creating a customization that includes special permissions to see or use the customization.
- You want to create a solution that can be re-distributed amongst coworkers and colleagues to improve daily workflow
- A client has requested specific functionality not available from a standard Relativity installation
- Management asks for a specific feature they’d like to deploy across several environments
Don't build an application if
- You want to create a single field in a workspace. Rather than building an application, which has a lot of overhead, use the UI.
- You only want to perform a specific action once. Rather than building an application, use a script or the UI.
Application development tools
Tools for application Development include:
- Postman – test calls quickly, determine required headers, bodies, and other parameters.
- NuGet Packages - provides easy to locate and use assemblies for application development.
- DevHelp – forum resource for tips, tricks and seeking advice. See Get started with the Relativity DevHelp Community.
- Documentation Site – contains code samples, best practices, and tips and tricks for RelativityOne and Relativity development. See Relativity Developer Documentation.
Building your first application
This tutorial provides step-by-step instruction on how to build an application that creates a custom object in a workspace and periodically creates new RDO entries. The application demonstrates some of the basic CRUDQ operations the platform offers via querying and creating as well as the flexibility and reuseability of the application framework/ADS.
| Concepts covered | Application includes |
|---|---|
|
|
To build your first application, follow the steps in these sections:
- Step 1 - Begin creating the application in Relativity
- Step 2 - Create an agent in Visual Studio
- Step 3 - Finish building the application in Relativity
- Step 4 - Export and deploy the application in Relativity
Step 1 - Begin creating the application in Relativity
To begin creating the application:
- Create a new workspace in Relativity, or choose a pre-existing workspace.
- Create a new Relativity Application in the workspace you created or selected.
- From within the workspace, navigate to the Relativity Applications tab.
- Click New Relativity Application.
- Complete the required fields.

- For Application Type, select Create new Application.
- For New Application Name, enter Build Your First Application.
- Click Save. The Default Relativity Application Layout opens for Build Your First Application.
- Create a new Object Type.
Under Object Type (Relativity Applications) section, click New.
- In the Name field, enter Workspace Information.
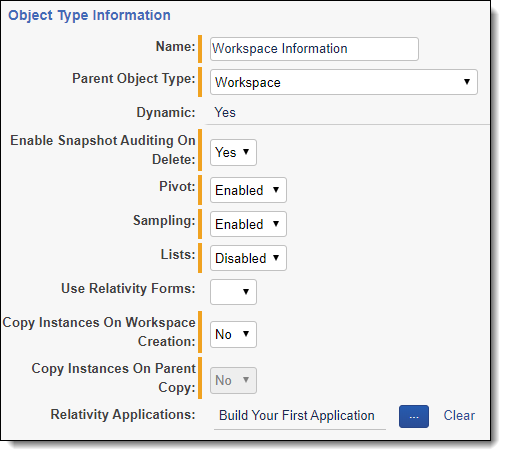
- Click Save.
- Click Back to return to the Default Relativity Application Layout for Build Your First Application.
-
Create three fields of type int for the Workspace Information object. To add a field:
- Under Field (Relativity Applications), click New.
- Complete the required fields.
(Click to expand)
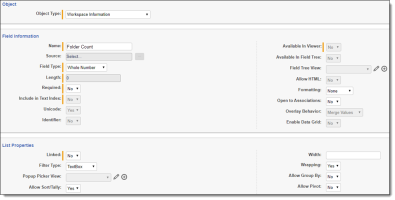
- For Object Type, select Workspace Information.
- For Name, enter Folder Count.
- For Field Type, select Whole Number.
- Click Save and Back.
-
Repeat this process to create fields named Document Count and Choice Count.

- Add a view specific to the application.
- Under View (Relativity Applications), click New.
- Complete the required fields.

- For Name, enter Information.
- For Order, enter 200.
- For Object Type, select Workspace Information.
- Click Next.
- To the Selected Fields column, add Choice Count, Document Count, and Folder Count.

- Click Save.
- In the Relativity Application Console for Build Your First Application, click Push to Library and then Ok. Pushing the application to the library, makes Build Your First Application publically available in the Relativity Library, increments the application version number, deploys any necessary components (such as a custom page), and locks the application in the workspace you pushed from.

Step 2 - Create an agent in Visual Studio
To create an agent in Visual Studio:
- Create a new project and agent in Visual Studio.
Note: To complete this step, you must have Relativity Templates installed in Visual Studio. See Relativity Templates for Visual Studio.
- Open Visual Studio.
- In the File menu, click New Project.
- In the Create a new project dialog, search for and select Relativity Agent.
- Click Next.
- In the Project name field, enter BYFA_Agent.
(Click to expand)
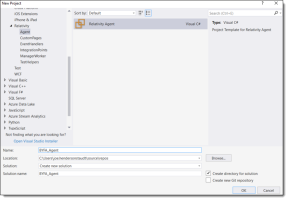
- Click Create.
- Update the nuget packages in Visual Studio to match the version of Relativity you are developing against.
In the Tools menu, click NuGet Package Manager and then Manage NuGet Packages for Solution....
(Click to expand)
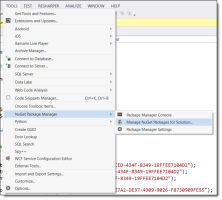
- Click the Updates tab.
- Check the box next to Relativity.Agent.
- Click Update.

- Obtain the GUID values for Build Your First Application's Relativity components.
- In Relativity, navigate to the Relativity Applications tab in the workspace you created the application.
- Select Build Your First Application.
- Click Show Component GUIDs in the Relativity Application console.
Note: To see Show Component GUIDs, the DeveloperMode instance setting must be set to True.

The Application Components window opens and displays the GUID values for your Relativity Application. Components are automatically assigned a GUID by Relativity when they are added to an application.
(Click to expand)

-
Add the GUIDs from the Application Components window to the agent code in Visual Studio as variables for reference.

- The agent needs to determine what workspaces have Build Your First Application installed so that it can then update the fields in these locations. Add the following method to the agent’s code, outside of the execute function:
- Add methods to query information and create new entries to your Visual Studio project, outside of the execute block.
- Verify that your full agent code looks like this:
- Once the agent is complete, build and save your solution.


Step 3 - Finish building the application in Relativity
To finish building the application:
- Upload the agent to Relativity.
- In Relativity, navigate to the Resource Files tab.
- Click New Resource File.
- Complete the required fields.

- In the Application field, select Build Your First Application.
Note: If you do not see Build Your First Application in the list of options, repeat the last step in Step 1 - Begin creating the application in Relativity.
- In the Resource File field, click Choose File and navigate to the directory where your agent solution was saved. Access the bin folder for the agent and select BYFA_Agent.DLL for upload.
- Click Save.
- In the Application field, select Build Your First Application.
- Link the agent to the application.
- In Relativity, navigate to the Relativity Applications tab in the workspace you created the application.
- Open Build Your First Application.
- In the Relativity Application console, click Unlock Application and then Ok.
- Under Agent Type (Relativity Applications), click Link.
- In the list of available agents, filter on the Application field for Build Your First Application, and check the box next to BYFA_Agent.
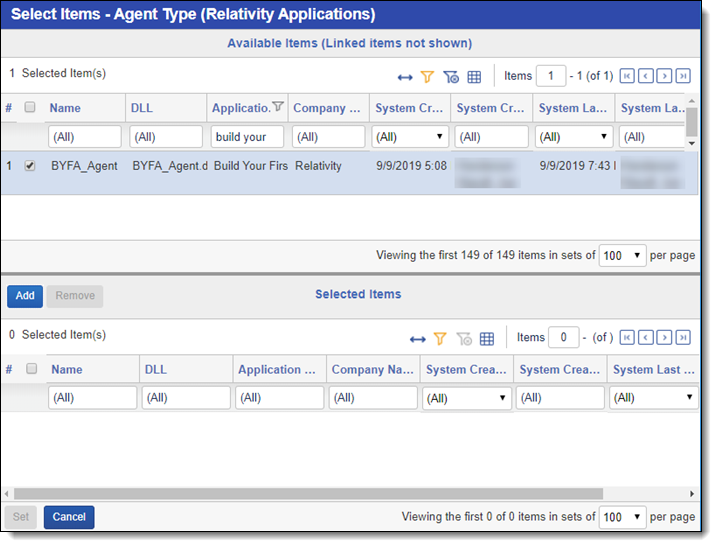
- Click Add. The agent displays in the Selected Items section.
- Click Set.
- Verify that the following artifacts are attached to your application:
Section Artifacts Object Type (Relativity Applications) - Workspace Information
Field (Relativity Applications) - Choice Count
- Document Count
- Folder Count
- Name
View (Relativity Applications) - All Workspace Information
- Information
Layout (Relativity Applications) - Workspace Information Layout
- Information Display
Tab (Relativity Applications) - Workspace Information
Agent Type (Relativity Applications) - BYFA_Agent
- Click Push to Library on the Relativity Applications console.
Step 4 - Export and deploy the application in Relativity
Now that the application is complete, you can export and deploy the application.
Export the application
To export the application as a RAP file:
- Navigate to the Application Library tab at the instance level.
- Select Build Your First Application. Details such as the workspaces the application is installed in, version number, and contained artifacts display.
- Click Build_Your_First_Application.rap in the Application File field. This will save a copy of the RAP file to your machine. You can then install this RAP file in Relativity environments with the same version as yours.

Deploy the application
To deploy the application:
- Navigate to the Agents tab at the instance level.
- Click New Agent.
- Complete the required fields

- For Agent Type, select BYFA_Agent.
- For Number of Agents, enter 1.
- For Agent Server, select an appropriate server.
- For Run interval, enter 15 seconds.
- For Logging Level, select Log critical errors only.
- Click Save.
The agent will deploy and begin updating. After a short period of time, you should begin seeing updates in the workspaces where the application is installed.
